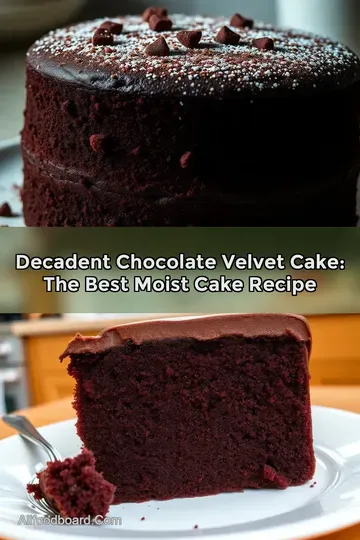
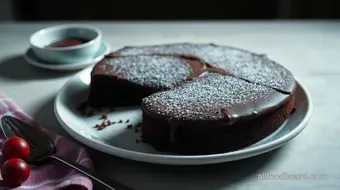
Chocolate Velvet Cake
Discover the ultimate cake recipe! This Chocolate Velvet Cake is rich, moist, and perfect for any occasion. Get ready to impress your loved ones!

Oh my gosh, let me tell you a little story! i remember the first time i baked a cake recipe from scratch.
It was my birthday, and i thought, "why not impress everyone and make my own cake?" spoiler alert: i had flour on my face, but the cake turned out sooo good (thank you, pinterest)! that feeling of biting into a slice of something you made yourself is simply unmatched.
Whether you're celebrating a big occasion or just want something sweet after dinner, homemade cake really hits the spot!
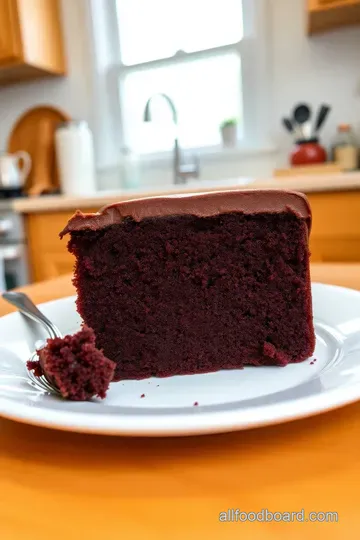
Now, let's dive into the world of cakes. the chocolate velvet cake has its roots in classic chocolate cake recipes, but let's be real—this one is something special! with its moist texture and rich flavor stemming from the combination of buttermilk and cocoa powder , it’s no wonder this cake is loved by so many.
It’s perfect for birthdays, anniversaries, or just a chill afternoon snack. and honestly? no one can resist a slice of this chocolatey delight!
Recipe Overview
The origins of the chocolate velvet cake go way back, riding the waves of culinary history. it’s like a rich piece of chocolate history, drawing from the traditional chocolate cake recipes we all know and love.
As time has rolled on, it has morphed into a modern favorite. great for both special occasions and casual dinners, this cake remains popular thanks to its moist cake recipe that keeps everyone coming back for seconds!
Now, don’t get scared; while this cake has a few steps, it's still rated as medium difficulty. you won’t need to call in a pastry chef to whip this up, but it might be a fun challenge for a novice chef looking to take their skills up a notch.
Plan for about an hour and five minutes from start to finish, and yield a hearty batch of around ten slices—perfect for sharing or maybe just keeping to yourself (no judgment here).
Key Benefits
Let's chat about the benefits of this delightful chocolate velvet cake. first off, it’s packed with flavor . the deep chocolate notes when paired with a soft, moist texture make it a total show-stopper.
Not just for birthdays, this cake shines at any gathering. serve it up at a spring brunch, a cozy tea party, or even during a friday night movie marathon.
Honestly, it fits any occasion that calls for something sweet!
Health-wise, i’d say you might want to take it easy on the frosting (we all know it’s the best part, though).
You can also make this cake healthier, swapping out ingredients to suit your dietary needs. the versatility makes it a notch above many other dessert recipes, like those classic carrot cake recipes .
And who doesn’t love an easy homemade cake that you can put your own twist on? the options are kind of endless here!
Plus, the unique selling point of this cake? you can totally jazz it up. add fresh raspberries, a drizzle of chocolate ganache, or even a light sprinkle of sea salt for an unexpected twist.
Trust me, your friends will think you're a kitchen wizard!
Transition to Ingredients
Now that we've spun a yarn about why this cake is a home run, let’s talk about what you’ll need to whip up this chocolate velvet cake.
Grab your mixing bowls and put your apron on because we’re about to make something delicious!
In just a moment, i’ll break down all the ingredients you’ll need to create this cake masterpiece. but i can almost guarantee you, once you've got this beauty baked and frosted, you’ll be the star of the show.
Ready to see what goes into this yummy recipe? let’s get to it!
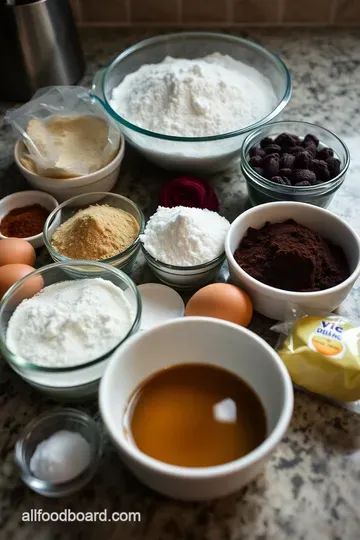
Your Ultimate Essential Ingredients Guide
So, you wanna whip up some tasty goodness in the kitchen? whether it's for a cake recipe or a home-cooked feast, the secret sauce is having the right ingredients.
Let’s break this down into bite-sized chunks.
Premium Core Components
Okay, let’s chat about the heart and soul of any recipe — your ingredients! first off, be sure to take note of detailed measurements .
Yes, we love a good cup measurement , but don’t forget that metric magic too! here’s a quick tip: always use a kitchen scale for precision.
If you're making that moist cake recipe , you won’t want any guesswork.
You should also look for quality indicators for each ingredient . fresh herbs should smell fragrant, and your spices should still pack a punch.
Trust me, old spices can ruin your whole vibe! that brings me to storage guidelines : most spices are good for six months to a year, but don’t fret—your flour can chill for up to a year if stored properly.
Cool, dry places are your bffs when it comes to ingredient storage.
And listen closely— freshness tips are essential! check produce for blemishes, and always go for the seasonal stuff. in summer? grab those ripe peaches! making a delicious carrot cake? go find those vibrant carrots at the farmers market.
They will make your homemade vanilla cake sing!
Signature Seasoning Blend
Moving on to the fun part— signature seasoning blends! the right spices can turn a humdrum dish into something we’ll remember at the dinner table.
Think classic combinations! paprika, garlic powder, and pepper make a fab trio for savory treats. if you’re feeling fancy, try fresh herbs like thyme and rosemary in your next savory dish or dessert recipes .
And in case you didn’t know, flavors can be regional. ever tried adding fresh cilantro to a taco dish? so good! you might consider a little twist by combining local spices like old bay for a mid-atlantic vibe.
The world of seasoning is super vast, so mix it up a bit!
Smart Substitutions
Life happens, and sometimes you can’t find that exact ingredient. that’s where smart substitutions come in handy! if your recipe calls for buttermilk and you just can’t do dairy, a simple swap could be one cup of almond milk with a squeeze of lemon juice.
Voila! dairy-free just got easy!
Or, maybe you're in a pinch and missing some flour for that carrot cake recipe ? swap in half almond flour for a nutty twist.
Honestly, it's all about being flexible! keep a rolling list of common alternatives that work well for you and don’t forget the seasonal options — think pumpkin spice in fall !
Kitchen Equipment Essentials
Equip yourself with the must-have tools in your kitchen. the basic ones? a sturdy mixing bowl, a good whisk, and a non-stick baking sheet.
Electric mixers are handy but a good ol’ whisk can do the trick too, especially if you’re trying to channel your inner mad scientist vibes!
If you find yourself with limited gear, no sweat! use what you’ve got —if you don’t have a stand mixer, a hand mixer gets the job done.
As for storage solutions, i’m all for glass containers with snug lids. they'll keep your ingredients fresh while looking cute in your pantry.
And there you have it! we're gearing up for some serious baking adventures, whether it’s cupcakes or that best vanilla cake recipe you’ve been meaning to try.
Grab your ingredients and tools, and weave your magic! next up, let’s dive straight into the instructions for the chocolate velvet cake that'll make everyone swoon.
Your taste buds are officially invited!
Mastering the Professional Cooking Method: A Delicious Journey
So, you want to dive into the world of professional cooking? that's awesome! it's more than just stirring a pot or flipping burgers; it's about finesse, precision, and a little bit of love.
Let’s break it down, shall we?
Essential Preparation Steps
First things first, let’s talk about mise en place . this fancy french term is chef speak for having everything in its place.
Get your ingredients measured and prepped. trust me, it makes cooking smoother than a sunday morning pancake flip.
Now, onto time management! pro cooks don’t just waltz around the kitchen; they work with purpose. get a timer handy.
I recommend using your phone—set timers for each step. for our chocolate velvet cake , keep 30 minutes in mind for baking.
Organize your tasks so you're not scrambling at the last minute.
Speaking of organization, keep your space neat! Clean as you go. You’ll be surprised how much this reduces chaos. And, of course, safety first, folks! Always keep knives away from the edge of counters and remember to wash your hands before you dive into that delicious homemade vanilla cake batter!
Step-by-Step Process
Alright, let’s get into the nitty-gritty with some clear step-by-step instructions .
-
Preheat the oven to 350° F ( 175° C) . Got it? Great!
-
Mix your dry ingredients : In one bowl, blend your flour, cocoa powder, and sugars. It's like a mini-lagoon of deliciousness.
-
Combine your wet ingredients : In another bowl, whisk your eggs with buttermilk, oil, and vanilla. Seriously, the aroma of vanilla makes everything feel cozy.
-
Combine mixtures : Pour the wet mix into the dry, being careful not to go overboard. Just combine until mixed—that light texture is key.
-
Add hot coffee : No, this isn’t for you—it’s for the cake! It works its magic here, adding depth and flavor.
-
Pour into pans and bake for 30- 35 minutes until a toothpick comes out clean.
So, watch it closely. At 30 minutes , check for doneness because we don’t want any surprises!
Expert Techniques
Here’s a pro tip you’ll appreciate: never underestimate the power of temperature control. always let your cakes cool in their pans for 10 minutes —believe me, nobody enjoys the mess from a cake sliding around.
While frosting, remember to let your cakes cool completely or your frosting will melt into a gooey mess. Also, consider these quality checkpoints: a smooth batter, well-mixed ingredients, and even baking.
If something goes wrong—yikes!—don’t sweat it. Got a dry cake? Douse it with a little simple syrup for moisture. That’s what makes an Easy Vanilla Cake Recipe a game-changer!
Success Strategies
Let’s dodge some common pitfalls. Skip the overmixing stage ; nobody wants a rubbery slice of cake. Aim for that perfect rise by making sure your baking powder is fresh.
For quality assurance, do a taste test! it’s your masterpiece; you should love it! and if you’re short on time, you can make parts of your cake ahead of time.
Bake the cake layers a day in advance and frost them the next day. trust me; it’ll be great!
Now, let’s say you’re feeling adventurous. Why not try a carrot cake recipe ? With lovely spices and cream cheese frosting, scratch that itch for something traditional while keeping it simple.
Ready to whip up these iconic dessert recipes? There are so many ways to enjoy vanilla cakes too! Think about a moist cake recipe topped with fresh berries for added flair.
Additional Information
With all this knowledge under your apron, you’re poised for sweet successes or savory delights! whether you’re tackling a trendy carrot cake recipe or perfecting that moist cake recipe , remember, cooking is just like life—worth savoring, one delicious bite at a time.
So, to all the novice chefs out there, let’s roll those sleeves up and get baking!
Pro Tips & Secrets to a Flawless Cake Recipe
Alright, friends! let’s dive into some insider tips that’ll take your cake recipe to the next level. if you’re like me—a true lover of all things sweet—these little secrets will be a game-changer.
Chef's personal insights: when i whip up my chocolate velvet cake , i always start with room temperature ingredients . so, take those eggs and buttermilk out ahead of time.
Trust me, it makes everything blend better and you end up with a moist cake that's dang near perfect!
Time-saving techniques: on a tight schedule? who isn’t? consider using one bowl for dry and one for wet ingredients to save on dishes.
Mixers can be fun, but a good whisk works wonders for ingredients without making a mess everywhere!
Flavor enhancement tips: want to elevate that chocolatey goodness? add a splash of vanilla extract and a pinch of espresso powder to the batter.
It deepens the chocolate flavor, and your friends will be begging for the secret ingredient.
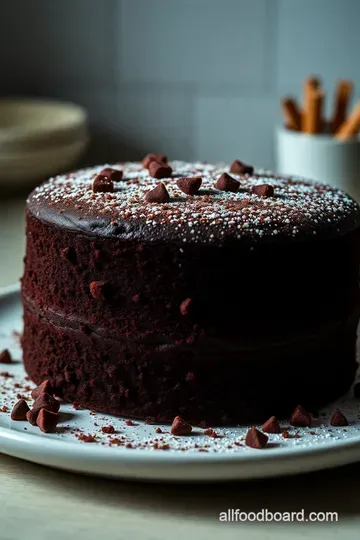
Presentation Advice: One last pro tip—don’t underestimate the power of a good garnish . A sprinkle of cocoa powder or chocolate shavings can turn a simple cake into an Instagram-worthy masterpiece!
Perfect Presentation
Now that you’ve got the cake baked (and maybe a little frosting on your cheek), let’s talk about how to present it like the pro you are!
Plating Techniques: Place your cake on a cake stand for that home bakery vibe. If you don't have one, a pretty dinner plate will suffice.
Garnish Ideas: A few fresh berries on the side or a dusting of powdered sugar can brighten up the dessert! Arrange them like a confetti party on a plate.
Color Combinations: Contrast is key! Nothing beats the look of rich dark chocolate cake against a creamy white frosting. It’s like they were meant to be!
Visual Appeal Tips: Keep it simple but stunning; a bare layer cake has a charm that screams sophistication.
Storage & Make-Ahead Tips
Sometimes, life gets busy, and that’s alright! Here’s how you can keep your cake fresh for later enjoyment.
Storage Guidelines: If you have leftovers (which I doubt, honestly!), place it in an airtight container. It’ll stay fresh on the counter for a solid 2-3 days.
Preservation Methods: For longer-term storage, wrap individual slices tightly in plastic wrap and pop them in the freezer. They’ll last for up to three months !
Reheating Instructions: Just thaw them in the fridge overnight when you’re ready to indulge.
Freshness Duration: A good rule of thumb? Your cake is fresh for 2-3 days at room temp. After that, the moisture starts to leave, and nobody likes a dry cake!
Creative Variations
Stuck in a rut? Spice it up with some creative twists on that classic cake recipe !
Flavor Adaptations: If you want to mix it up, why not try adding fresh mint in the frosting? My friends rave about it every time!
Dietary Modifications: For vegan friends, swap the eggs for flax eggs and use a plant-based milk! Your batter won’t even know the difference.
Seasonal Twists: When the seasons change, add crushed pumpkin or spices like nutmeg and cinnamon for a cozy autumn feel.
Regional Variations: Feeling adventurous? Try a Southern pecan pie topping for some crunchy goodness.
Complete Nutrition Guide
Let’s get real about what’s in this cake, shall we?
Detailed Breakdown: A slice of your Chocolate Velvet Cake has about 360 calories, and hey, it’s a treat, not a punishment. Enjoy it!
Health Benefits: Chocolate does have antioxidants—so, you’re technically eating healthy, right? That’s how I justify it, anyway.
Dietary Considerations: If you’re concerned about sugar, use a sugar alternative. Just keep in mind that it might change the texture a bit, but it’s worth experimenting!
Portion Guidance: Cut those slices generous, but not too huge! Aim for that sweet spot where you’re satisfied, not stuffed.
So there you have it, folks! with these tips tucked in your apron pocket, you’re all set to impress with the best vanilla cake recipe , or even a scratch carrot cake recipe if that’s your vibe.
Remember, whether you’re a novice chef or a seasoned pro, getting hands-on in the kitchen is always about having fun .
Let’s get baking and leave everyone begging for our delish cakes ! happy baking!
Frequently Asked Questions
What makes this chocolate velvet cake recipe different from a traditional chocolate cake?
This Chocolate Velvet Cake stands out due to its unique texture, achieved by using buttermilk and hot coffee in the batter. These ingredients contribute to a rich, moist cake that has a delightful crumb, reminiscent of the plush softness of velvet—hence the name!
How can I make my cake recipe rise higher?
To ensure your cake rises nicely, make sure to use fresh baking powder and baking soda. Also, it's crucial not to overmix the batter once the wet and dry ingredients are combined; mix just until combined to keep that airy texture!
Can I make this chocolate velvet cake in advance?
Absolutely! You can bake the cake layers a day prior and store them wrapped in plastic wrap at room temperature. For longer storage, freeze the layers for up to 3 months. Just remember to let them cool completely before wrapping!
What are some variations I can try with this cake recipe?
There are plenty of fun variations! For instance, you can add a layer of raspberry jam between the cake layers or substitute half of the flour with almond flour for a nutty twist. Feel free to experiment with flavors in the frosting, like adding coffee granules for a mocha effect!
How should I store leftover chocolate velvet cake?
Store any leftovers in an airtight container at room temperature for up to 3 days, or refrigerate for up to a week. If you prefer to keep it for longer, you can freeze individual slices wrapped well in plastic wrap and foil for up to 3 months!
Is this cake suitable for special dietary needs?
Yes! You can make this cake gluten-free by substituting the all-purpose flour with a gluten-free flour blend. Additionally, for a dairy-free option, use coconut oil instead of butter and a non-dairy milk substitute. Always check your ingredients to ensure they align with your dietary requirements!
Chocolate Velvet Cake Card
⚖️ Ingredients:
- 1 ¾ cups (220 g) all-purpose flour
- ½ cup (50 g) unsweetened cocoa powder
- 1 ½ cups (300 g) granulated sugar
- 1 ½ teaspoons baking powder
- 1 ½ teaspoons baking soda
- ½ teaspoon salt
- 2 large eggs, room temperature
- 1 cup (240 ml) buttermilk, room temperature
- ½ cup (120 ml) vegetable oil
- 2 teaspoons vanilla extract
- 1 cup (240 ml) freshly brewed hot coffee
- ½ cup (115 g) unsalted butter, softened
- 2/3 cup (50 g) unsweetened cocoa powder
- 3 cups (360 g) powdered sugar
- 1/3 cup (80 ml) milk
- 1 teaspoon vanilla extract
🥄 Instructions:
- Step 1: Preheat your oven to 350°F (175°C). Grease and flour the cake pans or line with parchment.
- Step 2: In a large bowl, whisk together flour, cocoa powder, sugar, baking powder, baking soda, and salt.
- Step 3: In another bowl, beat the eggs, then add buttermilk, oil, and vanilla extract; mix until combined.
- Step 4: Slowly pour the wet mixture into the dry ingredients; mix until just combined.
- Step 5: Carefully stir in the hot coffee until the batter is smooth (it will be thin).
- Step 6: Divide the batter evenly between the prepared cake pans.
- Step 7: Bake for 30-35 minutes until a toothpick inserted comes out clean.
- Step 8: Allow cakes to cool in pans for 10 minutes, then transfer to a wire rack to cool completely.
- Step 9: In a bowl, beat butter, then mix in cocoa powder, powdered sugar, and milk until smooth.
- Step 10: Once the cakes are completely cool, frost the top of one layer, place the second layer on top, and frost the top and sides.
Previous Recipe: Easy & Refreshing Orzo Recipes: Zesty Lemon Herb Salad to Try!
Next Recipe: Fluffy Cottage Cheese Pancakes: An Easy, Delicious Breakfast Recipe