Classic Homemade Apple Pie
Discover the best apple pie recipe with a flaky crust and juicy filling! Perfect for holidays and cozy nights. Get my trusted tips inside!

- The Apple Pie Recipe: A Slice of Comfort
- Essential Ingredients Guide
- Professional Cooking Method: Elevating Your Cooking Game
- Pro Tips & Secrets for the Best Apple Pie Recipe
- Storage & Make-Ahead Tips
- Creative Variations
- Complete Nutrition Guide
- Final Thoughts: Bake Away!
- Frequently Asked Questions
- Recipe Card
The Apple Pie Recipe: A Slice of Comfort
Oh my gosh, have you ever had a day where all you want is something that wraps you in a warm hug? that’s exactly how i felt last fall.
It was one of those crisp, golden afternoons, you know the ones. leaves were crunching underfoot, and the air smelled like pumpkin spice and nostalgia.
I decided it was high time i put an apron on and tackled my grandma’s classic apple pie recipe . honestly, it felt like a culinary hug was just waiting in my oven.
The essence of this homemade apple pie is deep-rooted in american culture. it’s that symbol of cozy family gathering – whether it’s thanksgiving, summer picnics, or just a sunday dinner.
When you step into a home and smell those sweet and tart apples mingling with cinnamon and nutmeg, it’s like warm memories wrap around you.
These flavors have been dancing on american tables for generations.
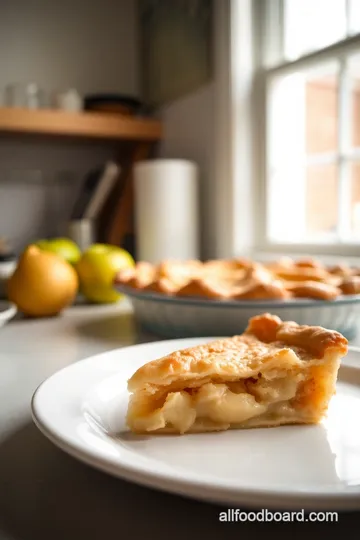
Making this pie might seem daunting, but trust me, it’s a piece of cake—well, pie! you can whip this up in about 90 minutes , with a 30-minute chill time for the dough and a 45-50 minute bake.
The cost? about 10-15 bucks depending on where you shop. not too shabby for a dessert that serves 8 folks.
Who doesn’t love a crowd-pleaser?
Heaping Health Benefits: More Than Just Deliciousness
Now, i can hear you asking if there’s any health benefit in indulging in this traditional apple pie . well, while pie might not scream “superfood,” apples are packed with fiber and vitamins.
Plus, a sprinkle of nutmeg in apple pie gives you a burst of flavor with potential health benefits too!
Besides the health boost, there’s something simply special about serving a good pie. it’s the go-to for birthdays, holidays, and those sweet “just because” moments.
And let’s be real—the flaky pie crust and warm, spiced apple filling totally outshine those store-bought desserts. you can also play with different variations: oh, the delight of cinnamon apple pie or maybe a dollop of caramel on top.
All you have to do is roll with your creative vibes!
Sweet and Savory Memories: The Perfect Pairing
Honestly, the only way to make a fresh apple pie better is with a scoop of ice cream. can you picture it? the warmth of the pie meets the cold creaminess.
It’s the perfect combo. whether you go for vanilla or salted caramel, it’s a moment of divine bliss!
On colder days, this pie brings some serious comfort food vibes. Think about it: what better thing to enjoy while watching your favorite movie on a lazy Sunday than a slice of apple pie with ice cream ? And did I mention how great it is to serve after a snowball fight with a hot cup of cider? Total mood booster!
Let’s Gather the Goods
So, are you feeling the pull of that oven door beckoning? the apple pie filling is calling, and it’s time to gather some fresh ingredients for this delightful dessert.
We’ll whip up that beautiful pie crust recipe , fill it with deliciously spiced apples, and set your kitchen up for some major aroma explosion.
After all, this is more than just following a recipe. it’s about creating connections, memories, and that warm feeling of home.
Don’t worry; i’m right here with you! ready to dive into the exciting world of apple pie recipes from scratch ? let’s get those ingredients together, and i promise this pie will knock your socks off!
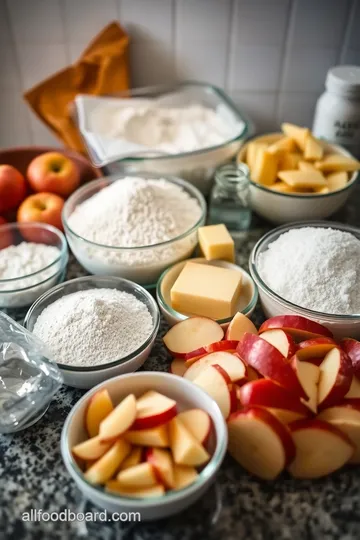
Essential Ingredients Guide
Baking—the sweet, warm hug that makes any day better! whether you're doing it for yourself or impressing guests, having the right ingredients takes your apple pie recipe from basic to mind-blowing.
Let’s dive into the essentials!
Premium Core Components
When it comes to your classic homemade apple pie , it starts with the premium core components . You want your ingredients to sing, right?
Measurements are crucial, so here's the lowdown:
- All-purpose flour: 2 ½ cups (315 grams)
- Granulated sugar: ¾ cup (150 grams)
- Unsalted butter: 1 cup, chilled and diced (226 grams). This is the magic for that flaky pie crust we all crave.
Now, how do you know if your ingredients are top-notch? look for the quality indicators like fresh-smelling spices and firm apples.
For apples, i recommend a mix of sweet and tart apples like honeycrisp and granny smith for the best flavor.
Storage? keep flour in an airtight container, and pop your butter in the fridge. it lasts a long while when stored correctly—up to 6 months for butter, and a year for flour! but don't forget the freshness tips : check for clumps in flour and funky smells—if anything seems off, toss it.
Signature Seasoning Blend
Now let's talk signature seasoning blends —they're where the magic happens.
For your pie, the holy grail of spices is a classic combo of cinnamon and nutmeg . i sprinkle about 1 teaspoon of cinnamon and half that for nutmeg into my apple pie filling to really amp up those cozy vibes.
Want to get fancy? Add a bit of vanilla extract or a splash of lemon juice for some zing. And if you’re feeling adventurous, try a cinnamon apple pie or throw in some cardamom for a unique twist!
Smart Substitutions
We all have those days when we realize we’re missing an ingredient. Fear not! Understanding smart substitutions can save your pie night.
If you run out of apples, use frozen apple slices (just thaw and drain), or even pears for a twist.
For the crust, swap out all-purpose flour for whole wheat. this gives it a nutty flavor and makes it a bit healthier.
A suggestion? if you're short on sugar, honey or maple syrup can work in a pinch. and if it's dairy-free you’re after, replace butter with coconut oil!
Kitchen Equipment Essentials
Having the right kitchen equipment makes all the difference.
You don't need fancy tools; just the basics will do. grab yourself a good rolling pin and a 9-inch pie dish .
I’ve learned the hard way that a sturdy pie dish is key for even baking. a mixing bowl for your dry ingredients and a measuring cup for accuracy are must-haves too.
Preparation tips: prepare your pie crust ahead of time and chill it for about 30 minutes. this helps achieve that heavenly flaky texture we all love in a traditional apple pie .
Remember, a little advance planning goes a long way!
When it comes to storage solutions , keep your baked goods covered and stored in a cool place to maintain freshness.
Oh, and for leftovers—if there are any—slice that pie and refrigerate it to enjoy later!
So, with these essential ingredients in hand, you’re almost ready to embark on your apple pie adventure! the kitchen is your playground, and every recipe is a chance to add your personal touch.
Next, let’s jump into the step-by-step instructions for that best apple pie recipe . relax, have fun, and let the sweet aroma of cinnamon and baked apples waft through your kitchen.
It’s time to create something delicious!
Professional Cooking Method: Elevating Your Cooking Game
Cooking is an art, and at the heart of it lies a technique that separates the pros from the amateurs.
So, if you want to whip up masterpieces in your kitchen, let's dive into some professional cooking methods that’ll transform your meals from average to absolutely drool-worthy.
Sure, i’m talking about how to nail that classic apple pie with a flaky crust and perfectly spiced filling. but hey, these tips can elevate any dish, whether you're making lasagna or that fancy soufflé you keep dreaming about.
Essential Preparation Steps
Alright, let's start with the mise en place . it's just a fancy way of saying "everything in its place." before you even think about turning on the oven, gather all your ingredients.
For that apple pie recipe, you’ll need your sweet and tart apples , butter , and those spices that make grandma’s recipe legendary —like nutmeg and cinnamon.
Having everything on hand makes you feel like a rockstar and minimizes chaos.
Time management is key, too! set a timer for tasks like peeling those apples and making your pie crust . it sounds simple, but breaking your tasks into chunks keeps you on track.
If you're a bit of a forgetful cook like me (oops!), these little nudges help.
Now, let’s talk organization strategies . use bowls for each ingredient and place them neatly on your counter. trust me, you’ll thank yourself when it comes time to toss that apple pie filling together.
And please, don't forget safety considerations! always keep a clean workspace and use your knife safely. no one wants a trip to the er for a cut when you’re trying to make homemade apple pie !
Step-by-Step Process
Now for the nitty-gritty—the step-by-step instructions that guide your cooking journey. I learned the hard way, folks, so let’s keep it clear.
-
Make the Dough : First up, make a simple pie crust. Using cold butter is essential; we're aiming for that magical flakiness .
-
Cool it in the fridge for 30 minutes . while it’s chilling, peel and slice about 6 cups of apples .
Use a mix of granny smith and honeycrisp for that perfect balance.
-
For the filling, combine your apples with 3/4 cup of sugar , 2 tablespoons of flour , a dash of cinnamon , and a sprinkle of nutmeg .
Give it a good toss and let it sit for 10 minutes . this helps the apples release some juices and mix well with those spices.
-
Don’t forget to preheat your oven to 425° F . This is a crucial moment—if your oven isn’t hot enough, your pie won’t bake to golden perfection!
-
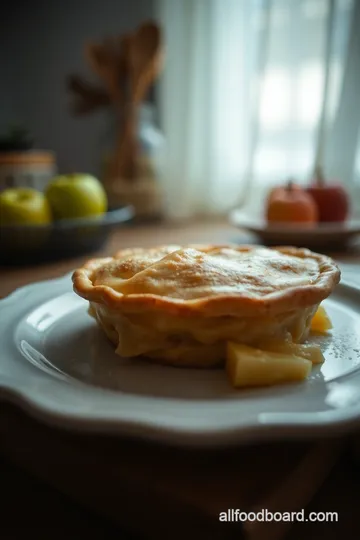
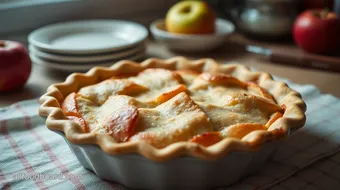
Pop that pie in for 40- 50 minutes . keep an eye on it—look for that golden crust and bubbles peeking through the slits you made earlier.
It’s like a little cooking edible show!
Expert Techniques
When you’re cooking, it's all about those expert techniques that often get overlooked. one tip? be precise with your temperature control points .
If you’re at home and want to replicate a bakery's crisp crust, your oven's temperature should stay steady.
Quality checkpoints are also key. halfway through baking, i like to peek at my pie for visual cues. a little jiggle is all good, but if things look too watery, it might need some extra time.
Oh, and if your pie smells weird—but in a bad way—trust your instincts. something might be off there!
Got a pie that didn’t come out right? don’t sweat it. troubleshooting tips can save the day. for instance, if the bottom crust is soggy, bake it blind for a few minutes first.
Pre-baking can keep that crust crisp and ready for the delectable apple pie filling .
Success Strategies
Now, let's tackle the success strategies that ensure you don’t end up with a "meh" pie. first off, avoid common mistakes like overmixing your dough.
Rustic isn’t just a buzzword—it actually can mean a dry crust!
Quality assurance tips should include a taste test on your apple filling. If it’s too sweet or lacks zingy goodness, you can always adjust.
And if you want to make it ahead of time, that’s a great call! apple pie can be made the day before.
Just warm it back up at 350° f for 15- 20 minutes when you’re ready to serve.
Additional Information
So, whether you’re eyeing that best apple pie recipe for thanksgiving or just whipping up a comfort food classic, these techniques can completely transform your cooking game.
The kitchen might seem daunting, but each step builds upon the last, making you closer to dishing out homemade desserts that impress.
Keep experimenting with apple pie variations and always remember, baking is just like life—a little sweetness, a hint of tartness, and a whole lot of love make for great results.
So go ahead, serve that apple pie warm with ice cream and enjoy the delicious accolades!
Pro Tips & Secrets for the Best Apple Pie Recipe
So you’ve got your apple pie recipe ready, huh? awesome! but before we dive into the baking bliss, let me throw some pro tips your way to make your classic homemade apple pie a real winner.
First up, don’t skimp on those chill times ! keeping your butter and water super cold is the secret sauce to achieving that flaky pie crust .
Trust me, it’s a game-changer. and when handling that dough? be gentle, okay? overworking it can turn your crust into a tough little round.
You want tender, not tough!
Time-Saving Techniques
If you’re racing against the clock, prep your apple pie filling ahead of time. just toss those heavenly slices with your sugar and spices, cover ‘em in the fridge overnight, and let those flavors mingle.
You'll save a solid chunk of time when you're ready to bake.
Flavor Enhancement Tips
For that extra zap of flavor, mix up your apples. seriously, use a blend of sweet and tart apples . i love combing granny smith with something sweeter like a honeycrisp.
Zesty meets sweet is a winning combo! and don’t forget about nutmeg in apple pie for a cozy, warm touch.
Perfect Presentation
Now, let’s talk about making that pie look as good as it tastes. plating may sound fancy, but it's super simple.
Try dusting your freshly baked pie with some powdered sugar right before serving to really pop! you can also get artsy with your crust.
Use a knife to cut lovely little leaves or hearts in the top crust for a homely vibe.
And don’t skip the garnish! A sprig of mint or a sprinkle of cinnamon can elevate your dessert game. Plus, if you’re serving it warm, a good scoop of vanilla ice cream next to your pie is basically a no-brainer!
Storage & Make-Ahead Tips
If you’re thinking of saving some for later (because, why not?), here’s how: wrap your pie tightly in plastic wrap or foil and pop it in the fridge.
It’ll stay fresh for about 3-4 days . if you want to keep it longer, you can freeze it, and trust me, it still holds up.
Just make sure it’s fully cooled before wrapping it up so you don't end up with a soggy bottom.
Reheating Instructions
When it's time to dig in again, you can reheat your pie in the oven to bring back that fresh apple pie vibe.
Just cover it with aluminum foil and pop it in at 350° f for about 15- 20 minutes, and bam! it’ll taste like it just came out of the oven.
Creative Variations
Okay, this is where the fun comes in! want to shake things up? try adding in some dried cranberries or raisins to the filling.
And if you’re feeling adventurous, how about a cinnamon apple pie or switching up the spices with cardamom? just imagine the warm, toasty aroma wafting through your kitchen during a chilly evening!
And hey, if you’re trying to keep things allergy-friendly, swap out butter for coconut oil. or if you’d like to try a new twist every season, how about using some sliced pears along with your apples? talk about a baked apple dessert that’s filled with all kinds of seasonal flavors.
Complete Nutrition Guide
Now let’s get real about nutrition. a slice of your homemade apple pie might average around 250 calories per serving, and you know what? that’s not too shabby for a serving of good ol’ comfort food.
Throw in some amazing antioxidants from those apples and you’re looking at a dessert that can bring a little joy to your day, not guilt!
Portion Guidance
When serving, slice those pieces a little smaller if you’re looking to balance out calories with a scoop of ice cream on the side. Remember, life’s all about balance!
Final Thoughts: Bake Away!
So there you have it! with these tips, your easy apple pie becomes a piece of cake… um, i mean pie.
Seriously, just dive in, have fun with the flavors, and before you know it, you’ll have the most delightful apple pie that’ll knock the socks off at any family gathering or thanksgiving table.
Now get your apron on and channel your inner baker! Your kitchen is about to smell AMAZING, and your taste buds are gonna thank you! Happy baking, friends!
Frequently Asked Questions
What type of apples are best for an apple pie recipe?
The best apples for apple pie are those that balance sweetness and tartness. A mix of tart varieties like Granny Smith and sweeter options like Honeycrisp or Fuji creates a deliciously complex flavor. Avoid using apples that are too soft, as they can turn to mush when baked.
How can I prevent my apple pie crust from getting soggy?
To prevent a soggy crust, consider pre-baking (or blind-baking) the bottom crust for a few minutes before adding the apple filling. Additionally, using a thickening agent like flour mixed with the apple filling helps absorb excess moisture. Keep your dough chilled until ready to bake, which will also aid in creating a flaky texture.
Can I make the apple pie dough ahead of time?
Absolutely! You can prepare the pie dough a day or two in advance. Simply wrap it tightly in plastic wrap and store it in the refrigerator. For longer storage, freeze the dough, ensuring it's well-wrapped to prevent freezer burn. Just remember to thaw it in the refrigerator before rolling it out for your apple pie recipe.
What are some variations I can try with this apple pie recipe?
There are many fun variations to experiment with! You might add in dried fruits like raisins or cranberries for a twist, or top your pie with a crumb topping instead of a second crust for a streusel effect. Switching up the spices, such as adding allspice or cardamom, can also change the flavor profile of your beloved apple pie.
How should I store leftover apple pie?
Store leftover apple pie in the refrigerator, covered loosely with aluminum foil or plastic wrap, for up to 4 days. If you want to keep it longer, it can be frozen for up to 3 months. To reheat, simply place it in the oven at 350°F (175°C) until warmed through, which will help retain the crust’s crispiness.
What is the nutritional information for this apple pie recipe?
Each serving of this classic apple pie contains approximately 250 calories, 2g of protein, 12g of fat, and 36g of carbohydrates, along with 2g of fiber and 10g of sugar. It's a delightful treat, but keep in mind that these values can vary based on specific ingredient choices and serving sizes.
Classic Homemade Apple Pie Card
⚖️ Ingredients:
- 2 ½ cups all-purpose flour
- 1 teaspoon salt
- 1 tablespoon granulated sugar
- 1 cup unsalted butter, chilled and diced
- 6-8 tablespoons ice water
- 6 cups peeled and sliced apples
- ¾ cup granulated sugar
- 2 tablespoons all-purpose flour
- 1 teaspoon ground cinnamon
- ½ teaspoon ground nutmeg
- 2 tablespoons lemon juice
- 1 tablespoon unsalted butter (optional)
🥄 Instructions:
- Step 1: In a large mixing bowl, whisk together flour, salt, and sugar.
- Step 2: Cut in the chilled butter until the mixture resembles coarse crumbs.
- Step 3: Stir in ice water, one tablespoon at a time, until dough holds together.
- Step 4: Divide dough into two equal portions, shape into discs, wrap in plastic, and chill for at least 30 minutes.
- Step 5: In a large bowl, combine sliced apples, sugar, flour, cinnamon, nutmeg, and lemon juice.
- Step 6: Toss until apples are evenly coated; let sit for 10 minutes.
- Step 7: Preheat the oven to 425°F (220°C).
- Step 8: Roll out one disc of dough on a floured surface to fit the pie dish.
- Step 9: Place the bottom crust in the pie dish, pressing it against the sides.
- Step 10: Pour in the apple filling and dot with butter, if desired.
- Step 11: Roll out the second dough disc; place over the filling. Seal and flute the pie edges.
- Step 12: Cut slits in the top crust for steam to escape.
- Step 13: Place the pie on a baking sheet to catch any drips.
- Step 14: Bake in the preheated oven for 40-50 minutes or until the crust is golden brown and the filling bubbles.
- Step 15: Cool for at least 2 hours before serving.
Previous Recipe: Easy & Classic Sloppy Joe Recipe: A Messy Family Favorite
Next Recipe: Fluffy Classic Waffle Recipe: The Perfect Start to Your Day