Classic Neapolitan-Style Pizza Dough: The Perfect Base for Any Topping
Discover my classic pizza dough recipe! This easy, artisan-style dough is your perfect base for every topping. Let's make pizza night special!

Oh my gosh! did you ever have that heartwarming moment when the aroma of fresh pizza wafts through your kitchen? it's like a warm hug on a plate, am i right? there's just something about a homemade pizza that brings everyone together.
Today, i’m diving into my favorite pizza dough recipe , a classic neapolitan-style dough that’s your ticket to pizza perfection.
Seriously, making your own homemade pizza crust is not just a flex for your friends; it’s a way to create those taste sensations right in your own kitchen!
So, why go through the effort? well, in this fast-paced world, digging into a little homemade goodness feels downright nostalgic.
And let’s face it: nothing beats the satisfaction of pulling a bubbly pie from the oven. whether you're whipping it up for a sunday family dinner or hosting a casual get-together, this pizza dough recipe is the real deal.
Recipe Overview
Let’s take a little trip back in time! the roots of neapolitan pizza date back to the late 18th century in naples, italy.
It’s like the original pizza that everyone else has tried to replicate. fast forward to today, it's a staple in pizzerias and home kitchens alike.
With its simplicity and focus on high-quality ingredients, it’s no wonder this dough is loved by many!
Now, if you’re worried about the time commitment, don’t fret! this isn’t going to take all day. you’ll spend about 15 minutes prepping, and while it rests, you can binge-watch that new show everyone’s raving about.
The total time is about an hour, but traditionalists might want to let that dough slow-ferment in the fridge for up to 24 hours for an extra flavor kick!
In terms of cost , the ingredients are pretty basic and won't break the bank. you probably have most of them hanging out in your pantry right now.
With this best pizza dough recipe , you can yield two 12-inch pizzas, which means double the fun!
Key Benefits
Let’s talk health! did you know that making your own pizza dough can be way better for you? you can control what goes in there! forget the preservatives—you know exactly what you are munching on.
Plus, you can customize it to fit your needs, like that gluten-free pizza dough or even a whole wheat pizza crust if you're feeling sprightly.
There are a ton of unique selling points to making your own dough. first off, when you make it fresh, you gotta love that texture—crispy on the outside and chewy on the inside.
It’s a texture dream! and the taste? so much better than store-bought.
Perfect for special occasions, this dough can dress up or down. think family pizza night, super bowl parties, or cozy date nights at home.
You can even play around with toppings to create fresh variations. the possibilities are endless!
When you compare this dough to others, the traditional italian pizza dough really stands out. it’s not just about filling your stomach; it’s about enjoying a pizza dining experience that transports you right to the streets of naples.
Ready to whip up your very own artisan pizza? Awesome! Before we jump into the ingredients you’ll need, remember to grab your favorite toppings. Let’s get that tasty ball rolling!
Essential Ingredients Guide for the Perfect Pizza Dough
When it comes to making an outstanding pizza dough recipe , having the right ingredients on hand is crucial. honestly, nothing beats that fresh, homemade pizza crust hot out of the oven! so, let's break it down and get right into it.
Premium Core Components
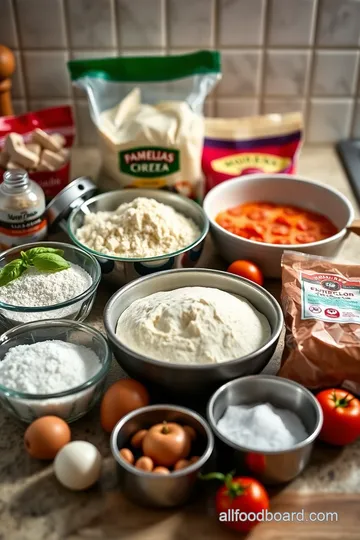
First things first— measurements ! For our dough, you need:
- 4 cups (500g) all-purpose flour or "00" flour.
- 1 ½ teaspoons (8g) salt .
- 1 teaspoon (4g) sugar .
- 1 ½ teaspoons (6g) active dry yeast .
- 1 ¾ cups (420ml) warm water (about 110° F or 43° C).
- 1 tablespoon (15ml) olive oil (for an extra flavor boost).
Quality indicators ? look for flour with high protein content for a better chew. make sure your yeast is fresh.
Trust me, nothing’s worse than a flat dough! store your flour in a cool, dry place, and your yeast in the fridge if it’s opened.
It will last about 6 months , but do a sniff test before using it.
When picking your ingredients, go for freshness. Look for any lumps or weird smells. It should smell kind of earthy and like home.
Signature Seasoning Blend
Speaking of flavor, enhance your dough with some herbs and spices ! A sprinkle of dried oregano or basil can turn your traditional Italian pizza dough into something special.
You can also experiment with your seasoning. if you love a bit of zest, throw in some garlic powder or crushed red pepper flakes.
Mix and match based on what you fancy! and hey, if you’re not feeling italian, use whatever you have in your spice cabinet.
Smart Substitutions
Oh, we all forget an ingredient sometimes, don’t we? No worries! Here are some common alternatives :
- If you’re out of active dry yeast , you can use instant yeast or even sourdough starter—just adjust your water accordingly.
- Don’t have all-purpose flour? Use bread flour for a chewier texture, or try a whole wheat pizza crust for a healthier option.
- Got a gluten-free friend? There are some great gluten-free flour blends out there that work nicely.
Remember, when choosing substitutes, keep your dietary restrictions in mind.
Kitchen Equipment Essentials
Okay, let’s chat about the tools you need. You don’t need a million gadgets, but a few essentials will make your pizza making a breeze.
- A good mixing bowl.
- An easy-to-handle dough scraper . This thing is a game-changer!
- A clean surface for kneading. Honestly, you can just use your kitchen counter.
- Cover your dough with plastic wrap or a damp cloth to keep it cozy while it rises.
Now, if you don’t have a pizza stone (guilty!), use a baking sheet upside down. It’ll give you a decent crust, though nothing beats that crispy bottom!
Tips for That Perfect Dough
Here’s the deal: dough rising time is essential for developing flavor. if you have time, let it rise for at least an hour at room temperature.
Better yet, pop it in the fridge to ferment overnight. major flavor boost!
For that crispy pizza crust , preheat your oven with your pizza stone inside for at least 30 minutes at 475° f ( 245° c).
And, when it comes to shaping methods , don’t just roll it out—stretch it with your hands for that artisan feel.
Whether you’re making a thin crust pizza recipe or a rustic pie, these tips will elevate your pizza baking experience.
So, now that we've covered everything from ingredients to tools, you’ll be all set to roll out your classic Neapolitan pizza dough ! Get ready for a homemade pizza night like no other! Let’s dive into the step-by-step instructions for crafting your own artisan pizza base !
Mastering the Professional Cooking Method for Pizza Dough
So, you’re ready to dive into making your pie from scratch? awesome! let’s chat about the professional cooking method that’ll have you slinging dough like an italian pizzaiolo in no time.
Think neapolitan pizza dough meets homemade pizza crust —all the nostalgic vibes and deliciousness!
Essential Preparation Steps
Before we jump into the heat of it all, let’s get our ducks in a row. this is where mise en place comes into play.
It’s a fancy way of saying, “get everything ready before you start.” measure your pizza dough ingredients carefully so you don't find yourself scrambling mid-recipe.
Time management is key, especially when you’re waiting for that dough to rise. a successful pizza preparation timeline will save your evening gourmet fiasco.
Plan out your pizza dough rising time , so it coincides with when you want to eat.
And let’s not forget about safety. Keep that area clean and your hands sanitized. You don’t want any unwanted guests ruining your pizza dining experience, right? A little safety goes a long way!
Step-by-Step Process
Okay, let’s break it down step by step.
-
Activate yeast: in a bowl, combine 1 ¾ cups (420ml) warm water (around 110° f or 43° c ) with 1 teaspoon (4g) sugar and 1 ½ teaspoons (6g) active dry yeast .
Let it sit for 5- 10 minutes until it’s foamy, like your morning coffee!
-
Mix Ingredients: In a big ol' bowl, mix 4 cups (500g) flour and 1 ½ teaspoons (8g) salt . Make a well in the center and pour in your foamy yeast mixture.
-
Stir It Up: Mix until it’s a sticky mess, but follow your gut—this dough is the base for all your homemade pizza dreams!
-
Knead Away: Transfer it to a floured surface and knead for 8- 10 minutes until it’s smooth and elastic. Pro tip: Don’t overwork it; keep that dough tender!
-
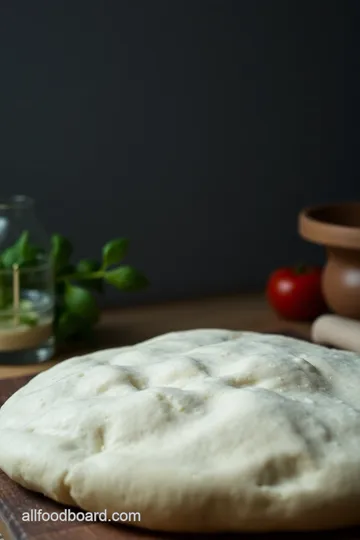
First rise: throw it in an oiled bowl and cover it up. let it rise in a warm spot for 1- 2 hours or until it doubles in size.
The anticipation is half the fun!
-
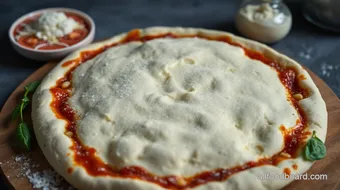
Shape it: punch it down and divide into two balls. at this point, you can shape your dough! this is also when you might want to think about a quick pizza dough alternative if time is slipping away.
Expert Techniques
Alright, let’s get into some expert-level tips. For that artisan pizza base , remember:
-
Keeping an eye on temperatures is crucial. when you get to baking, aim for 475° f ( 245° c) . get that pizza stone or baking sheet preheating for at least 30 minutes before baking to ensure a crispy pizza crust.
-
Timing precision matters. Bake your topped pizza for 10- 15 minutes . Look for that gorgeous golden brown color—it’s the visual cue that you’re doing it right.
-
If something doesn’t seem right, troubleshoot—was your dough too sticky? Maybe you need to hone your dough kneading techniques or check your yeast activation.
Success Strategies
Listen, we all mess up sometimes. Here are some common mistakes to avoid:
-
Skipping the first rise? Big no-no! That’s where the flavor develops. Embrace the chill of waiting—you’ll thank yourself later.
-
Don’t forget seasoning! A little pizza crust seasoning can elevate your crust to restaurant standards.
And if you’re planning a homemade pizza night , why not make the dough ahead? it stays well in the fridge for up to 24 hours and can even be frozen for later.
Embrace Your Pizza Journey
So, you see? making the best pizza dough recipe doesn’t have to be daunting. it’s all about preparation and understanding your ingredients.
With a little patience, you’ll be serving up a gorgeous traditional italian pizza dough that even the toughest critics will love.
Don't rush it, and trust the process.
Now that you've got the lowdown on creating this amazing dough, why not dive into some additional information on variations or pizza topping ideas? Let’s keep the good times rolling!
Additional Recipe Information for the Perfect Pizza Dough
Let’s dive deeper into that pizza dough recipe so you can nail it every time. making pizza at home is not just fun; it’s a complete game changer.
So, grab a glass of wine (or soda, no shame) and let’s break it down!
Pro Tips & Secrets
Alright, listen up. I’ve made more than my fair share of homemade pizza crust disasters, and I’m here to save you from those amateur blunders.
-
Chef's insights: when you're working with dough, patience is key. give it that pizza dough rising time it craves. seriously, don’t rush the fermentation.
Trust me, good things come to those who wait.
-
Time-Saving Techniques: Need dough ASAP? Try a quick pizza dough alternative with baking powder instead of yeast. It won’t have the same flavor, but hey, it’s pizza!
-
Flavor Enhancement Tips: Toss in some dried herbs right into the dough. Herb-infused pizza dough ? Yes, please! It gives that added layer of flavor.
-
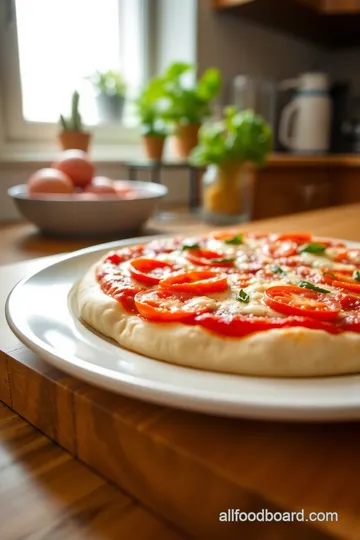
Presentation Advice: Roll it out to about 1/8 inch thin for a crispy pizza crust . Nothing beats that crunch when you bite in.
Perfect Presentation
Once your pizza is out of the oven and looking fabulous, let’s talk about how to serve it up like a pro:
-
Plating Techniques: A wooden cutting board screams rustic pizza vibes. Just slide that golden pie right onto it.
-
Garnish Ideas: Fresh herbs, like basil or parsley, sprinkled on top right before serving can elevate any pizza. It's like a sprinkle of magic!
-
Color Combinations: Don’t forget about color! Bright veggies, rich reds from the sauce, and whites from cheese create a feast for the eyes.
-
Visual Appeal Tips: Use a pizza cutter for those perfect slices. Nobody wants a pizza that looks like it was attacked by a bear, am I right?
Storage & Make-Ahead
Now, I know life gets busy. Here’s how to store your pizza dough and keep it fresh for when you’re in the mood for a slice.
-
Storage Guidelines: Wrap that dough tightly in plastic wrap and toss it in the fridge. It can last up to 3 days .
-
Reheating Instructions: Pop leftover pizza in a hot oven for about 5- 10 minutes. This brings back the crispiness!
-
Freshness Duration: If your dough has been fermenting for more than 24 hours, it’s still good, but the flavor will start to change. Use your nose, folks!
Creative Variations
Why stick to the same ol' pizza when you can switch it up?
-
Flavor Adaptations: Go crazy with toppings. BBQ chicken? Traditional Margherita? Spinach and feta? The world is your oyster—or pizza, in this case.
-
Dietary Modifications: A lot of friends are gluten-free these days. Use a gluten-free pizza dough to keep everyone happy.
-
Seasonal Twists: In fall, how about a pumpkin-flavored base? Sounds weird but trust me, it works.
Complete Nutrition Guide
Finally, let’s tackle the nutrition. Pizza doesn’t have to mean guilt!
-
Detailed Breakdown: With my best pizza dough recipe , you’re looking at about 270 calories per serving. Not too shabby for a delicious slice!
-
Health Benefits: Using whole wheat flour can boost the nutrition factor—hello, fiber!
-
Dietary Considerations: Always pay attention to your ingredients, especially with all those quirky flour types out there.
Now that we've broken down all the additional aspects of your pizza dough recipe , it’s time to get cooking.
Don’t stress perfection; just enjoy the process and embrace those delicious homemade fresh pizza variations . remember, it’s well about being with family and friends, sharing stories, and enjoying every bite! you got this; now go show off your pizza-making skills!
Frequently Asked Questions
What is the best pizza dough recipe for beginners?
The classic Neapolitan-style pizza dough recipe is great for beginners due to its straightforward steps. Just ensure you activate the yeast properly and allow the dough time to rise. With practice, you’ll master the kneading and shaping process, leading to delicious homemade pizzas.
How long should pizza dough rest before using?
For optimal flavor and texture, it’s best to let your pizza dough rest for at least 1-2 hours at room temperature after kneading. For enhanced flavor, you can refrigerate it for 1-24 hours, allowing the dough to come to room temperature for about 30 minutes before shaping and baking.
Can I make this pizza dough recipe in advance?
Yes, you can absolutely make the pizza dough in advance! After the first rise, you can wrap the dough in plastic wrap and store it in the refrigerator for up to 24 hours. This slow fermentation will improve the flavor and texture, making your pizzas even more delicious when you're ready to use it.
What are some variations for this pizza dough recipe?
There are several tasty variations you can try! You can add dried herbs like oregano or basil to the flour for extra flavor or substitute half of the all-purpose flour with whole wheat flour for a nutritious twist. Another option is to use gluten-free flour if you or your guests have dietary restrictions.
How do I store leftover pizza dough?
If you have leftover pizza dough, wrap it tightly in plastic wrap or place it in an airtight container and refrigerate it for up to 3 days. You can also freeze it for up to 3 months; just remember to thaw it in the refrigerator overnight before using it. This way, you can always have fresh pizza dough on hand!
Is pizza dough vegan-friendly?
Yes, this pizza dough recipe is vegan-friendly as it contains only flour, water, yeast, and salt. Additionally, the optional olive oil is plant-based, making this dough suitable for vegan diets. Just be cautious with your toppings to keep them vegan as well.
Classic Neapolitan-Style Pizza Dough: The Perfect Base for Any Topping Card
⚖️ Ingredients:
- 4 cups (500g) all-purpose flour or
- flour
- 1 ½ teaspoons (8g) salt
- 1 teaspoon (4g) sugar
- 1 ½ teaspoons (6g) active dry yeast
- 1 ¾ cups (420ml) warm water (about 110°F or 43°C)
- 1 tablespoon (15ml) olive oil (optional for added flavor)
🥄 Instructions:
- Step 1: In a small bowl, combine warm water, sugar, and yeast. Let sit until foamy (about 5-10 minutes).
- Step 2: In a large bowl, whisk together flour and salt.
- Step 3: Create a well in the flour mixture, pour in yeast mixture (and olive oil if using), and stir until a sticky dough forms.
- Step 4: Transfer to a floured surface and knead for 8-10 minutes until smooth and elastic.
- Step 5: Place dough in an oiled bowl, cover with plastic wrap or damp cloth, and let rise in a warm place for 1-2 hours, or until doubled in size.
- Step 6: Punch down the risen dough, divide into two portions, and shape each into a ball.
- Step 7: For enhanced flavor, cover and refrigerate the dough for 1-24 hours. Allow dough to come to room temperature for about 30 minutes before using.
- Step 8: Preheat oven with a pizza stone or baking sheet inside to 475°F (245°C) for at least 30 minutes.
- Step 9: On a floured surface, stretch or roll out dough to desired thickness (about 1/8 inch for thin crust).
- Step 10: Transfer to a pizza peel or baking sheet, add toppings, and bake for 10-15 minutes or until crust is golden and toppings are bubbly.
Previous Recipe: Classic Homemade Alfredo Sauce Recipe: Easy & Creamy Perfection
Next Recipe: Creamy Garlic Mashed Potatoes Recipe: A Family Favorite