Creamy Classic Hummus: The Ultimate Dip
Looking for the best hummus recipe? This creamy classic is quick, easy, and perfect for parties or healthy snacks. Dive into homemade goodness!

- Dip into Deliciousness: The Hummus Recipe You Need
- Essential Ingredients Guide for Making Hummus
- Elevate Your Culinary Game with Professional Cooking Techniques
- Pro Tips & Secrets for Perfecting Hummus
- Perfect Presentation for Your Hummus
- Storage & Make-Ahead Tips
- Creative Variations
- Complete Nutrition Guide
- Frequently Asked Questions
- Recipe Card
Dip into Deliciousness: The Hummus Recipe You Need
Have you ever thrown a party and stressed over appetizers? i totally have. picture this: it’s a saturday night, friends are coming over, and i find myself in a bit of a panic.
That’s when i stumbled upon my easy hummus recipe . oh my gosh, it was a game changer! not only did it save me from cooking a feast, but it also became a permanent fixture in our snacking habits.
If you’re eyeing something nutritious that wows your guests while keeping things simple, you’re going to want to get cozy with this classic hummus .
What’s the Hummus Buzz?
Let’s chat a bit about this mouth-watering middle eastern dip . hummus has ancient roots, dating back thousands of years in the mediterranean.
Legend has it that it originated in the levant region, but its charm has spread like wildfire across the globe.
Nowadays, everybody's swapping their creamy dips for this protein-rich wonder. i mean, who doesn’t love a good chickpea dip that’s not only delicious but also vegan? hustle over to your kitchen because this recipe is as simple as it gets!
You only need about 10 minutes of your time—no cooking required. seriously, just gather your ingredients and grab a food processor.
This hummus recipe churns out roughly four servings, making it perfect for an afternoon snack or even as one of those party appetizers where your friends are like, “wow, you made this?” cue dramatic music.
Why You’ll Love Hummus
So, let’s break this down. Why is this hummus so amazing?
First up, it's a fantastic healthy snack ! packed with nutritious snacks vibes, hummus is loaded with protein and fiber.
Plus, you can munch on it guilt-free while reaching for those crunchy veggies or pita chips.
Next, it’s incredibly customizable . looking for something extra? toss in some roasted garlic for that rich flavor or maybe a hint of spice to kick things up.
The world is your oyster—yeah, not literally, but you get it.
And let's not forget the occasions. birthdays, game nights, kid’s parties—hummus fits every vibe. not to mention, it makes you look like a superstar chef without breaking a sweat.
Plus, it’s a gluten-free appetizer that lets everyone join the fun, and i mean, how fantastic is that?
Health Benefits Galore
When i say this nutritious dip packs a punch, i mean it. it's a protein-rich snack that’s perfect for fueling your days.
Chickpeas are the stars here, offering health benefits, such as helping digestion and even helping with weight management. honestly, feel free to enjoy it guilt-free because it’s an all-around win for your health!
Plus, making meal prep hummus ahead of time is a total breeze! just whip up a batch and store it in the fridge for the week.
You’ll have an easy, accessible vegan appetizer at your fingertips. just dive into that storage tip and keep it in an airtight container.
Life doesn’t get much simpler!
Now that you’re (hopefully) hungry to dive into this hummus recipe , let’s chat about the ingredients you’ll need to get started.
Grab your measuring cups and food processor, and let’s make something delicious together. it’s time to blend until smooth ! you’re going to be serving up the most delightful lemon garlic dip in no time.
Essential Ingredients Guide for Making Hummus
Ah, hummus ! who doesn't love this creamy middle eastern dip? perfect for snacks, party appetizers, or just digging into with some fresh veggies.
But before you dive into that hummus recipe of yours, let’s break down the essentials that make this dip a star in the mediterranean recipes world.
Grab a cup of your favorite brew, and let’s chat about the ingredients you’ll need.
Premium Core Components
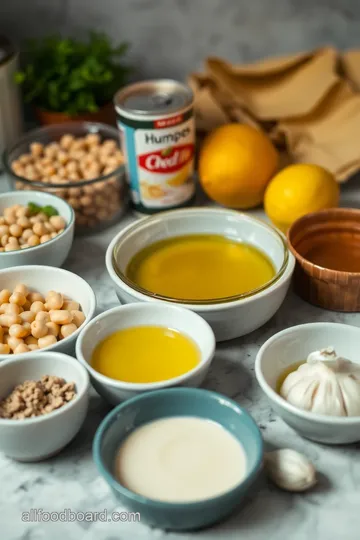
When it comes to making hummus , quality ingredients do matter. You’ll want to grab:
- Chickpeas: Use 1 can (15 oz or 425 g) of chickpeas, drained and rinsed, or boil your own from scratch. Fresh is always nice!
- Tahini: This is your creamy base, about 1/4 cup (60 ml) . Look for a good-quality sesame paste; it should be runny and not too hard to mix.
- Olive Oil: You’ll want 2 tablespoons (30 ml) for richness. Again, the better quality, the better the flavor!
- Lemon Juice: Fresh is best! About 2 tablespoons (30 ml) . A squeeze of lemon gives that refreshing zing.
- Garlic: Use 1-2 cloves , minced. Depending on how bold you want that flavor, you could even toss in some raw garlic vs roasted garlic for variety.
- Spices: You can't forget 1/2 teaspoon ground cumin and salt to taste. These elevate your hummus and make it pop!
When it comes to freshness, always check the expiration dates . chickpeas can last about 3-5 years in the pantry, whereas tahini usually sticks around for about 6 months once opened (definitely refrigerate it!).
Signature Seasoning Blend
Now let's dive into some signature seasonings :
-
Essential Spice Combinations: Cumin and garlic are classic. But don’t be afraid to experiment with chili powder or smoked paprika for a unique twist.
-
Herb Selections: Fresh herbs can uplift your hummus ! Think parsley or cilantro; they add a refreshing layer.
-
Flavor Enhancers: Ever tried adding roasted red peppers or even a dollop of yogurt? It makes a nutritious snack and takes your hummus to the next level.
Smart Substitutions
We all know that sometimes life throws curveballs. Don’t fret! Here are some common alternatives if you're missing something:
- Gluten-Free Appetizers: For tahini, if you've got sunflower seed butter, that works too.
- Dietary Modifications: If you’re cutting calories, think about using plain Greek yogurt instead of tahini. It’s still creamy, plus you get a bonus protein punch.
- Seasonal Options: Fresh herbs are usually best in summer but dried during winter works just fine!
Kitchen Equipment Essentials
Finally, let's talk kitchen equipment . You don’t need fancy gadgets:
-
Food Processor: This is a must! It blends everything until smooth. No food processor? A blender could work too, but you might need a bit more water.
-
Measuring Cups and Spoons: Accurate measurements make all the difference.
-
Spatula: Essential for scraping down the sides to ensure everything mixes well.
-
Storage Solutions: A good airtight container is your friend here. Your hummus can last about a week in the fridge if stored right. And trust me, you’ll want to keep those leftovers!
With these ingredients and tools in your corner, you're ready to whip up some easy hummus recipes that'll have everyone coming back for seconds.
Trust me, once you try it, you'll want to keep this recipe handy for when the craving hits!
Speaking of recipes, let's move on to crafting that creamy classic hummus that’ll knock your socks off! Stay tuned for the instructions!
Elevate Your Culinary Game with Professional Cooking Techniques
Alright, gang, let’s dive into some killer professional cooking methods that can totally up your kitchen game! we're gonna chat about everything from the basics to pro techniques that many chefs swear by—and of course, how they can help you whip up a fabulous hummus recipe that’ll knock everyone’s socks off.
Essential Preparation Steps
First things first, mise en place . i can’t stress this enough! it’s like the “get your ducks in a row” for cooking.
Have everything prepped and measured before you start. it’ll make the process smoother than butter on warm bread.
And let’s talk about time management . set a timer for each step, especially when boiling chickpeas for a batch of creamy classic hummus .
I learned the hard way—this one time, my garlic hummus was more like garlic mush because i lost track of time.
Keep your watch handy!
Organization plays a huge role, too. have your workspace tidy. it doesn’t need to look like a celebrity chef set, but you won't want to trip over a pile of dirty spoons mid-recipe.
And speaking of safety, make sure your cutting board isn’t sliding around. a little grip goes a long way in avoiding nasty cuts.
Always use a sharp knife —it sounds counterintuitive, but it’s safer than a dull one that can slip.
Step-by-Step Process
Now for the nitty-gritty! Here’s your step-by-step guide to making that homemade dip everyone’s gonna crave:
- Prep your ingredients . Drain a can of chickpeas and mince a couple of cloves of garlic.
- Blend the base . In a food processor, combine chickpeas, 1/4 cup tahini , and those garlic cloves. Blend until smooth —a minute or two should do.
- Add liquids . Scrape down the sides and add 2 tablespoons olive oil and lemon juice . Don’t forget the salt—season to taste!
- Adjust texture . If it’s too thick, add a tablespoon of water at a time until you reach that dreamy creaminess.
- Give it a taste . Sometimes it’s the little tweaks that make the biggest difference. Add more salt or lemon juice if it needs a punch.
Remember, temperature control is key! Serve your hummus right after blending for the best flavor. Or chill it in the fridge for about 30 minutes for a cooler dip.
Expert Techniques
Now that you have the basics down, let’s get fancy. One chef trick is to peel the chickpeas for an even creamier texture. Sounds tedious? Trust me, it’s worth it.
As for flavor, quality ingredients make a huge difference. use fresh lemon juice and the best tahini you can find—it’ll raise your hummus game tenfold.
Keep a watchful eye on your garlic, too. i swear by using raw garlic for a biting flavor versus roasted garlic for a mellow vibe.
It’s all about finding your favorite.
And hey, if your hummus ends up too runny, just add a little more tahini. If it’s too thick, that’s where the water comes in. No biggie!
Success Strategies
Okay, now let’s talk about avoiding those common pitfalls. the most frequent one is over-blending . too much blending can make your dip too airy and lose its creamy feel.
Aim for just a smooth enough texture.
Check on your seasoning—more salt can transform it from "meh" to "omg!" update your friends with that sunshine of flavor.
If you want to get a little creative, try using roasted red peppers or fresh herbs for variations.
And finally, if you’re prepping for a gathering, remember that hummus is a great party appetizer that allows for make-ahead options ! you can store it in the fridge for a week—just whip out your favorite vegan appetizers when friends come over.
Bringing It All Together
So there you have it! you’re ready to make not just any dip, but a stellar traditional hummus that can be the star of your dining table.
Paired with fresh veggies or pita, it’s a protein-rich snack everyone can enjoy. honestly, making homemade hummus isn’t just about impressing your guests, but also about indulging in a little mediterranean delight every time you snack.
As you whip up your next batch of creamy goodness, think of this as a fun journey. Cooking is all about experimenting and finding what works for you, right?
Now, let’s transition smoothly into our next segment with some Additional Information about different flavor variations and storage tips!
Pro Tips & Secrets for Perfecting Hummus
Oh my gosh, let me tell you, making the ultimate hummus recipe isn’t just about throwing ingredients in a blender.
It’s an art form! here’s where i share some of my sweet secrets and pro tips that’ll have your middle eastern dip flying off the table.
Chef's personal insights
first off, if you really want to kick your creamy dips up a notch, consider peeling your chickpeas.
Yup, i said it! sounds weird? trust me. it makes your hummus super silky smooth, like you got it right from a fancy mediterranean restaurant.
It’s just a little extra step, but the result? totally worth it.
Time-saving techniques
now, if you’re short on time (who isn’t these days?), there’s a neat trick: pop a few ice cubes in the food processor while blending.
This not only cools down your dip but also results in a creamier texture without heating up your kitchen. who knew a little chill could make such a difference?
Flavor enhancement tips
let’s talk flavor! the real magic happens with seasoning. if you’re a garlic lover like me, go for roasted garlic instead of raw.
It adds a sweet, mellow flavor that brightens up that traditional hummus vibe. and don’t shy away from a splash of smoked paprika or a sprinkle of cumin for that extra punch!
Presentation advice
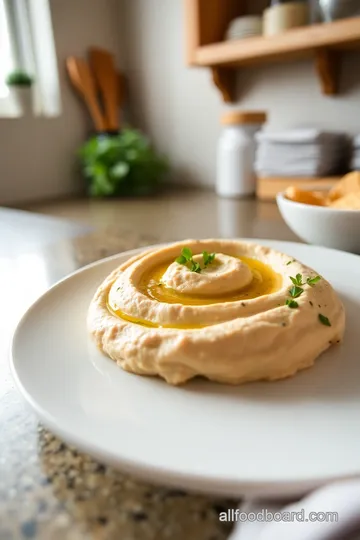
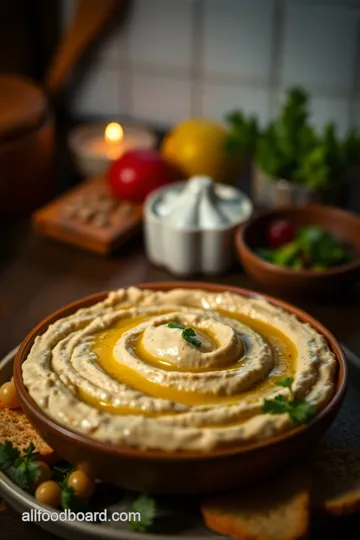
when it comes to serving, don’t just scoop and serve! grab a nice bowl and take your time drizzling some olive oil over the top.
Toss on a few chickpeas for extra flair and maybe some fresh herbs. it’s all about those instagram-worthy vibes, right? the more colorful, the better! think of it as edible art, because we eat with our eyes first.
Perfect Presentation for Your Hummus
Now that we’ve got the taste and texture down, let’s move on to showing off your homemade dip ideas .
Plating Techniques
Use a shallow bowl for your hummus instead of a deep one. this way, you get a beautiful surface to drizzle olive oil and display any toppings you want to add.
Think about those colorful toppings—paprika, fresh herbs, maybe some sliced olives.
Garnish Ideas
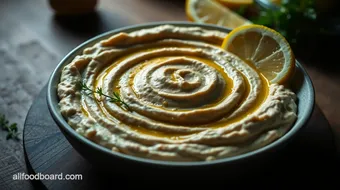
Speaking of toppings, don’t stop at olive oil! try adding some chopped parsley or a sprinkle of sumac for that perfect mediterranean flair; it just pops.
If you want to get fancy, sprinkle pomegranate seeds over the top. they bring little bursts of flavor and look stunning.
Color Combinations
Balance is key! aim for a mix of colors. fresh veggies like celery and bell peppers on the side not only make for great dipping but also add vibrancy to your platter.
And if you’ve got some gluten-free appetizers in the mix, like carrot sticks, all the better!
Visual Appeal Tips
Remember, the goal is to make that hummus look irresistible. the more appealing it looks, the more people will want to dive in.
So when you’re serving it at parties, don’t forget to sprinkle some herbs or a dash of paprika right before serving.
It’s the finishing touch that says, “hey, i care about food!”
Storage & Make-Ahead Tips
Okay, so maybe you made a little too much hummus—or did you? Here’s how to keep it fresh and ready to go.
Storage Guidelines
Store your hummus in an airtight container in the fridge. this will keep it fresh for up to one week .
If it starts to dry out, just drizzle in a bit of water or olive oil and give it a good stir to revive it.
Preservation Methods
If you want to take it to the next level, consider freezing your hummus. just scoop it out into ice cube trays.
Once frozen, pop those out and transfer to a ziplock bag. instant quick vegan snacks for those busy nights!
Reheating Instructions
Honestly, there’s no need to reheat hummus. It’s meant to be enjoyed chilled . But, if you’re feeling fancy, you can warm it slightly in the microwave. Just a few seconds, though!
Freshness Duration
If stored properly, your hummus stays fresh for up to a week. After that, it’s best to appreciate your masterpiece and whip up a new batch.
Creative Variations
Hummus is so versatile, and experimenting with flavors can be so much fun! You can customize it to your heart's content.
Flavor Adaptations
Take that basic hummus and add a twist! want something spicy? toss in a few jalapeños or sriracha for a kick.
Or maybe your taste buds are feeling adventurous? try a lemon garlic dip version by adding extra lemon juice and zest.
Dietary Modifications
If someone’s avoiding tahini (allergies, i get it), swap it out for sunflower seed butter. same creaminess, but different flavor.
And for the lovers of vegetarian or vegan appetizers , you’ve hit the jackpot here!
Seasonal Twists
In fall, why not throw in some roasted butternut squash for a seasonal twist? Talk about seasonal flair!
Regional Variations
look into into the Mediterranean recipes pool and channel different flavors from various regions. Add olives for a Greek vibe or beetroot for a colorful dip that makes everyone say, "Whoa!"
Complete Nutrition Guide
Now let’s get down to the nitty-gritty: what’s really in your lovely hummus?
Detailed Breakdown
With every serving packing about 100 calories and 4 grams of protein , this chickpea dip is not just tasty; it's a nutritious snack .
Plus, it's loaded with fiber, keeping you full longer.
Health Benefits
Chickpeas are seriously underrated. They're protein-rich, and full of vitamins and minerals. Trust me, your body will thank you after indulging in this healthy snack!
Dietary Considerations
This hummus is gluten-free , making it a fabulous choice for everyone at your party, and it's super easy to double down on if you've got a crowd!
Portion Guidance
I usually recommend one serving as around 1/4 cup. But hey, who's judging if you go for more? Dip it, spread it… Enjoy it!
So there you have it, my peeps! this easy hummus recipe isn’t just a meal but an experience. try it out, play with flavors, and make it your own.
Believe me, once you master this hummus, it’s going to be your go-to for every gathering, snack attack, or just a cozy night in.
Happy cooking!
Frequently Asked Questions
What ingredients do I need for a basic hummus recipe?
For a classic hummus recipe, you'll need canned chickpeas, tahini, olive oil, fresh lemon juice, garlic, ground cumin, and salt. These simple ingredients blend together to create a creamy and flavorful dip that you can enjoy with your favorite dippers.
How can I store hummus and how long will it last?
Store your hummus in an airtight container in the refrigerator, where it can stay fresh for up to one week. If you're looking to extend its shelf life, consider freezing portions in an ice cube tray and transferring them to a freezer bag for longer storage.
What are some variations I can try with my hummus recipe?
You can customize your hummus in many ways. For a roasted garlic flavor, use roasted garlic instead of raw. Other variations include adding spices like cayenne for heat, or incorporating fresh herbs like parsley or cilantro for a refreshing twist.
Is hummus a healthy snack option?
Yes, hummus is a nutritious snack packed with protein, fiber, and healthy fats, making it a great choice for a satisfying treat. Just be mindful of portion sizes, as the calorie count can add up quickly if you eat it with high-calorie dippers.
Can I use dried chickpeas instead of canned in my hummus recipe?
Absolutely! If you prefer using dried chickpeas, soak them overnight and then cook until tender before blending. This method may require a bit more prep time, but it can enhance the flavor and texture of your hummus.
How can I achieve a creamier texture in my hummus?
To get a creamier consistency, consider peeling the chickpeas before blending, as this removes the tougher skins. Additionally, adding a bit of cold water or ice cubes during blending can help create a smoother and silkier hummus.
Creamy Classic Hummus: The Ultimate Dip Card
⚖️ Ingredients:
- 1 can (15 oz or 425 g) chickpeas, drained and rinsed
- 1/4 cup (60 ml) tahini
- 2 tablespoons (30 ml) olive oil, plus more for drizzling
- 2 tablespoons (30 ml) fresh lemon juice
- 1-2 cloves garlic, minced
- 1/2 teaspoon ground cumin
- Salt, to taste
- Water, as needed (approximately 2-4 tablespoons or 30-60 ml)
🥄 Instructions:
- Step 1: Drain and rinse chickpeas. Mince garlic. Measure out tahini, olive oil, lemon juice, cumin, and salt.
- Step 2: In a food processor, combine chickpeas, tahini, minced garlic, and ground cumin. Process until the mixture is smooth.
- Step 3: Scrape down the sides of the bowl. Add olive oil, lemon juice, and salt. Blend again until fully integrated.
- Step 4: Slowly add water, one tablespoon at a time, until desired creaminess is achieved.
- Step 5: Taste the hummus and adjust salt or lemon juice as needed.
- Step 6: Transfer to a serving bowl, drizzle with olive oil, and add optional garnish if desired.
Previous Recipe: Classic Basil Pesto Recipe: A Fresh Taste of Italy in 10 Minutes
Next Recipe: Crispy Homemade Granola: A Nutty and Fruity Delight Recipe