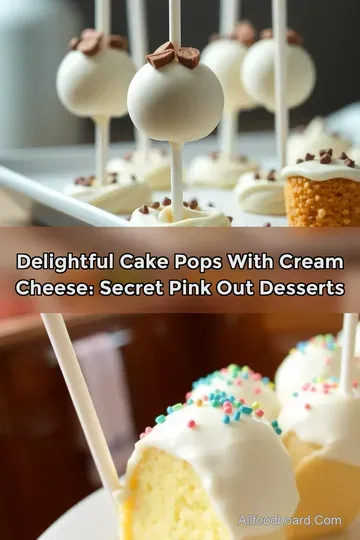
Creamy Dreamy Cake Pops with Cream Cheese
Whip up these delightful cake pops with cream cheese! Perfect for kids and adults alike, they're an easy dessert that makes any occasion special.

look into into the Delight: Cake Pops with Cream Cheese
Have you ever found yourself with leftover cake and no idea what to do with it? oh my gosh , i once faced that same dilemma after a birthday bash.
I mean, who needs plain ol' cake when you can transform that leftover goodness into something as cute as cake pops with cream cheese? seriously, it was like uncovering treasure! this mishmash of crumbled cake, creamy frosting, and chocolate coating was a total game changer.
If you're on the hunt for a fun, bite-sized dessert, keep reading!
Recipe Overview
Cake pops originated as a brilliant way to save cake scraps from going to waste. it started becoming popular around the early 2000s, thanks to creative bakers who thought, why not make cake on a stick? now, they’re strutting their stuff at birthday parties, baby showers, and every celebration in between.
Tiktok and instagram didn't hurt their popularity either, with those stunning shots of pink out desserts flooding our feeds!
You’re looking at a medium difficulty level here. yes, it takes a bit of patience to roll those pops just right and dip them in chocolate, but believe me, once you get the hang of it, it's smooth sailing.
Did i mention it takes approximately 1 hour and 10 minutes to whip these up? that includes a 30-minute chill time, so you can even squeeze in an episode of your favorite show or snack on some kawaii chocolate covered strawberries .
As for cost, it's pretty wallet-friendly. depending on what's in your pantry, you might end up spending around 15 bucks for about 24 cake pops .
Not too shabby for a dessert that’ll wow your friends!
Key Benefits
Now, let's talk benefits, because these cake pops offer way more than just cuteness. first off, the health aspect ! okay, i know what you're thinking—cake is cake, right? but hear me out! using cream cheese in the frosting cuts down on excessive sweetness, so you get a delightful tang to balance it all.
And hey, they’re portion-controlled, so you can enjoy without the guilt train rolling in.
Moreover, these pops are perfect for special occasions . whether it’s a valentine's day celebration with some valentine’s no bake treats or a birthday bash where they're the star of the dessert table, they're versatile.
Plus, they stand out much more than your average slice of cake. who wouldn’t want to munch on a colorful, fun cake pop? cake mix truffles no bake ain’t got nothin’ on these vibrant treats!
One of the best parts? you can totally customize them! change up the cake flavors, experiment with various toppings, or even try a strawberry truffles recipe for a fruity twist.
They outshine similar recipes, mainly because each pop is like a mini celebration packed in chocolatey goodness.
Transition to Ingredients Section
Ready to get your hands messy? awesome! let's dive into what you need for these creamy dreamy cake pops with cream cheese.
You're gonna love making each step your own and putting a touch of your personality into them. trust me, once you taste that perfect blend of cake and cream cheese frosting, you'll understand why these little bites of joy are taking the dessert world by storm.
Grab that apron, and let’s get started!
Essential Ingredients Guide to Cake Pops with Cream Cheese
Let’s talk about cake pops with cream cheese , shall we? these little bites of joy are not just for birthdays or fancy events; they’re a fun way to celebrate any day.
If you're diving into the realm of creating these delightful pops, knowing your ingredients is the key to success. so, let’s break it down!
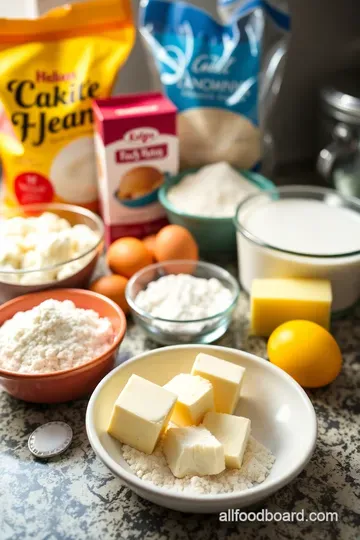
Premium Core Components
First things first, you gotta start with the essentials . Here’s a quick rundown of the core ingredients you'll need and how to keep them in tip-top shape.
-
Detailed measurements : for your cake pops, you’ll need 1 ½ cups of all-purpose flour, 1 cup of granulated sugar, and other second-hand items like ½ cup of softened butter.
That’s the us measurements, of course. for our metric friends, that’s 180g flour and 200g sugar.
-
Quality indicators : always go for fresh ingredients. your flour shouldn’t smell musty, and butter shouldn’t have any discoloration. look for eggs that are fresh from the farm.
Trust me, it makes a diff!
-
Storage guidelines : keep your flour sealed in a cool dry place. sugar? that can chill in your pantry forever! but the butter? pop that in the fridge if you’re not using it right away.
-
Freshness tips : check the “best by” dates, especially on dairy products like cream cheese. spoiled cream cheese? no thanks! and for your eggs, use the float test: submerged and fresh, floating and.
.. oh well, just toss it!
Signature Seasoning Blend
Let’s spice it up, shall we? While cake pops are mostly about sweetness, the right touches make all the difference:
-
Essential Spice Combinations : A sprinkle of cinnamon in the cake mix adds a lovely warmth.
-
Herb Selections : I know it sounds wild, but a hint of mint in the frosting? Just trust me, it’s fantastic!
-
Flavor Enhancers : Adding a splash of vanilla extract can elevate your cream cheese frosting to legendary status.
-
Regional Variations : Want to get wild? Try using a pinch of cardamom or even chili powder for a unique twist.
Smart Substitutions
We’ve all been there – you’re halfway through a recipe and realize you’re out of something. What to do? Here are some smart substitutions :
-
Common Alternatives : No cream cheese? Use mascarpone instead! It’s rich and creamy.
-
Dietary Modifications : Gluten-free flour is now available everywhere. Your friends with gluten issues will thank you.
-
Emergency Replacements : If you're totally out of butter, coconut oil in equal parts works well in a pinch.
-
Seasonal Options : Here’s a thought: swap out vanilla for pumpkin spice in the fall, and you have little cake pops of autumn !
Kitchen Equipment Essentials
Okay, let’s get our tools right, folks!
-
Must-Have Tools : A good mixing bowl, an electric mixer, and a baking pan are where you start. You need these to whip your cake mix up into fluffy perfection.
-
Alternative Equipment Options : Don’t have a food processor? Just crumble the cake with your hands. It’s fun!
-
Preparation Tips : Keep everything organized – measure out all your ingredients first. It’s a lifesaver!
-
Storage Solutions : Invest in some good containers for leftovers or to keep your cake pops fresh. You don’t want those pops going stale, trust me!
Now that you're all equipped with the essentials for your cake pops with cream cheese , it’s time to get down to the fun part: the instructions! this is where the magic happens.
You're going to create cake pops that are not only delicious but seriously stunning, too! let’s dive in and make some sweet memories (and cake pops) together – grab those ingredients and let’s get started!
The Art of Making Cake Pops with Cream Cheese
Oh my gosh, let’s talk about something that brings smiles just by looking at it— cake pops with cream cheese ! these delightful little bites are like magic on a stick.
Seriously, if you’re planning a birthday party or just a chill afternoon treat, these are your go-to. they’re sweet, creamy, and just plain adorable.
Essential Preparation Steps
Now, before you jump in, we gotta talk about mise en place . that’s just fancy talk for having everything ready to go.
Grab your ingredients, and measure them out. it’s like laying out your cardboard before you start building a fort!
And listen, time management is key! set a timer for your baking time—about 25 minutes at 350° f ( 175° c).
Trust me, nothing’s worse than losing track of time and burning that sweet batter into a lump of coal.
Let’s not forget about organization! keep your workspace tidy, like marie kondo came for a visit. a clutter-free kitchen helps you focus on getting those cute pops made.
Oh, and safety first: be careful with those sharp lollipop sticks!
Step-by-Step Process
Okay, let’s get into it! Here’s a breakdown of how you’re gonna nail these pops:
- Preheat your oven to 350° F ( 175° C) .
- Mix your cake batter, then pour it into a pan and allow it to bake for about 25 minutes . Use a toothpick to check; if it comes clean, you’re golden.
- Once the cake cools, crumble it into a bowl. Mix with cream cheese frosting until it forms a dough-like texture.
- Roll those into cute little balls—around 1 inch should do.
- Chill in the fridge for about 30 minutes to firm up.
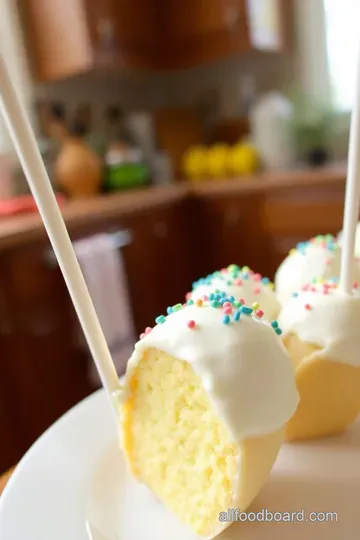
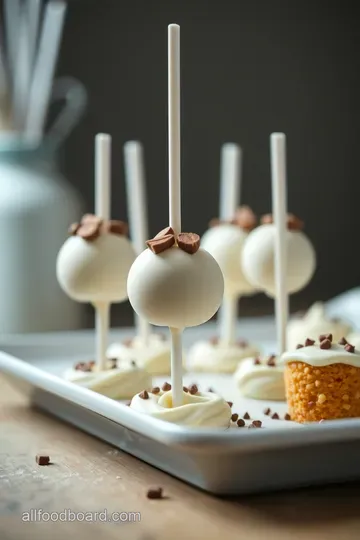
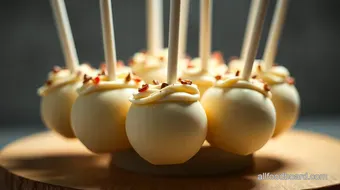
When you’re ready to coat, melt your chocolate chips. Dip a stick into the chocolate before pushing it into the cake ball. Now, dip the whole pop into that melted goodness!
Expert Techniques
Let’s make things a little fancier. If you want those pops to shine, consider tempering your chocolate. It’s a pro move that helps with the coating and gives it that glossy look.
Oh, and here’s a little nugget of wisdom: watch for quality checkpoints . If your cake pops are falling apart, you probably didn’t chill them long enough. Common mistake!
Success Strategies
Listen, every baker has a few mishaps, even me! one time, i dipped a bunch of pops but forgot to chill them first—let’s just say they looked more like sad blobs than cute treats.
Yikes!
To avoid mistakes, remember to use the right proportions. and always trust your gut when it comes to timing precision .
If you feel like they need an extra minute in the fridge, give it to ‘em.
For those make-ahead strategies, these pops freeze brilliantly. Just store them in an airtight container, and they’ll last for a few weeks! Pull ‘em out whenever you need a sweet pick-me-up.
Wrap-Up
So, there you have it! your guide to making creamy dreamy cake pops with cream cheese . whether you pair them with kawaii chocolate covered strawberries or serve them at a party featuring pink out desserts , they’re sure to be a hit.
And hey, if you mess up a batch? don’t sweat it! every cooking adventure comes with its challenges. bon appétit!
In case you're craving more dessert ideas, I’ll share some Additional Information about variations and fun substitutes that'll leave you swooning over your sweet creations!
The Inside Scoop on Creamy Dreamy Cake Pops with Cream Cheese
Ooh-la-la, friends! if you want to treat your sweet tooth, this is your moment. we're diving into the world of cake pops with cream cheese , and let me tell ya, they're not just pretty, they’re delicious! so, grab your apron and let’s get into how to nail these little delights.
Pro Tips & Secrets
Okay, first up, let’s chat about some pro tips! this is where i spill the beans on my little secrets.
When i first started making cake pops, i was a hot mess—seriously, chocolate everywhere! so here’s what i learned: chilling the mixed cake and frosting is crucial.
It helps the pops hold their shape like my favorite kawaii chocolate covered strawberries.
Time-saving tip? Consider using boxed mixes, like Pillsbury Strawberry Cake Mix Recipes . They taste good and save you a ton of time. You’ll thank yourself later, trust me!
For flavor enhancement, don’t skip the vanilla—it’s like the fairy dust of baking! a splash can elevate your cake pops from “meh” to “wow.
” and when it comes to presentation, less is more. a few sprinkles can turn those cake pops from ordinary to party-ready!
Perfect Presentation
Speaking of presentation, let’s get a bit artsy! plating is half the fun. try putting your yummy cake pops in a funky mug or a color-coordinated vase.
Choose colors that pop—like pink, red, and white for a valentine’s no bake treats theme.
For garnishes, sprinkled cocoa or crushed cookies can add a fabulous texture. Dip them halfway in chocolate for a cool two-tone effect. Honestly, your friends will think you're a dessert wizard!
Storage & Make-Ahead
Here’s the best part: you can whip up these cake pops ahead of time. store them in an airtight container in the fridge for up to a week or freeze them for longer.
Stand them upright to keep them pretty, just like those instagram-worthy strawberry cake balls recipe you’ve been eyeing!
When it’s time to devour, just pop them back in the fridge for a few minutes to soften. No one wants a rock-solid treat, am I right?
Creative Variations
Feelin’ a little adventurous? let’s talk variations! you can totally switch up the flavors, like using chocolate cake instead of vanilla.
Throw in some zest—lemon zest, to be specific—into your cream cheese frosting for an unexpected zing!
If you’re catering to dietary needs, don’t worry. You can make these cake mix truffles no bake using gluten-free flour and vegan cream cheese. It’s a win-win for everyone.
Complete Nutrition Guide
Now onto the nutrition part! for the health-conscious out there, these little bites of joy have about 150 calories each.
Not too shabby if you’re craving something sweet! they’ve got some protein, a bit of fat (because, hello, cream cheese), and carbs to give you a little energy kick.
Remember, portion control is key. maybe limit yourself to just a couple unless you want to dive headfirst into a plate of these bad boys.
I mean, i won't judge, but your waistline might!
Wrapping It Up
So, there you have it! you’re all set to make creamy dreamy cake pops with cream cheese . whether for a birthday party, tea time, or just to treat yourself on a friday night, these pops are your new go-to recipe.
look into in and let your creativity flow—whether it’s with flavors, colors, or shapes. Embrace the mess, enjoy the process, and most importantly, have fun! Happy baking!
Frequently Asked Questions
What are cake pops with cream cheese?
Cake pops with cream cheese are bite-sized treats made by combining crumbled cake with cream cheese frosting, rolling the mixture into balls, and coating them in chocolate. They offer a delightful balance of sweet and tangy flavors, making them a festive addition to parties and gatherings.
How do I prevent my cake pops from falling off the sticks?
To keep your cake pops secure on the sticks, make sure to dip the tip of the stick in melted chocolate before inserting it into the cake ball. Additionally, chill the formed cake pops for at least 30 minutes before coating them, as this helps to firm them up and keeps them from crumbling.
Can I make cake pops with cream cheese ahead of time?
Absolutely! You can prepare the cake pops up to a week in advance. Simply store them in an airtight container in the fridge once they are coated. If you want to keep them for longer, consider freezing them; just remember to let them thaw in the fridge before serving for the best texture.
Can I customize the flavor of my cake pops?
Yes! You can easily customize your cake pops by using different cake flavors, such as chocolate or red velvet, and adding various extracts like almond or orange. You can even mix in seasonal ingredients, like lemon zest in the frosting for a refreshing twist.
What can I use instead of cream cheese in cake pops?
If you're looking for a substitute for cream cheese, mascarpone works wonderfully; it will give you a similar creamy texture without the tang. Alternatively, you can use vegan cream cheese for a dairy-free option or buttercream frosting if you prefer a sweeter, less tangy flavor.
How can I make my cake pops more visually appealing?
For a pop of color, consider using sprinkles, edible glitter, or colored drizzles atop the chocolate coating. Using quality chocolate and ensuring a smooth coating can enhance the overall presentation, and placing them in a decorative Styrofoam block will make for a lovely display!
Creamy Dreamy Cake Pops with Cream Cheese Card
⚖️ Ingredients:
- 1 ½ cups (180g) all-purpose flour
- 1 cup (200g) granulated sugar
- ½ cup (115g) unsalted butter, softened
- 2 large eggs
- ½ cup (120ml) milk
- 1 tsp vanilla extract
- 1 ½ tsp baking powder
- ½ tsp salt
- 8 oz (225g) cream cheese, softened
- ½ cup (60g) powdered sugar
- 1 tsp vanilla extract
- 12 oz (340g) chocolate chips
- Sprinkles, optional, for decoration
🥄 Instructions:
- Step 1: Preheat your oven to 350°F (175°C). In a mixing bowl, cream together the softened butter and sugar until light and fluffy.
- Step 2: Add eggs, milk, and vanilla; mix until combined. In another bowl, sift together flour, baking powder, and salt. Gradually fold into the wet ingredients.
- Step 3: Pour the batter into a prepared baking pan and bake for about 25 minutes or until a toothpick comes out clean.
- Step 4: In a separate bowl, beat softened cream cheese with powdered sugar and vanilla until smooth and creamy.
- Step 5: Once the cake is completely cooled, crumble it into fine crumbs using your hands or a food processor.
- Step 6: Combine cake crumbs with cream cheese frosting until well mixed.
- Step 7: Roll the mixture into 1-inch balls and place them onto a parchment-lined tray. Chill in the fridge for about 30 minutes.
- Step 8: Melt chocolate chips in a microwave or double boiler until smooth.
- Step 9: Dip the tip of each lollipop stick in melted chocolate, then insert it into each cake ball. Dip each cake pop into the melted chocolate, allowing the excess to drip off.
- Step 10: If using, sprinkle with toppings before the chocolate sets. Place upright in a Styrofoam block to harden.
Previous Recipe: Easy & Tangy Sauerkraut Salad: A Crunchy Delight for Summer
Next Recipe: Easy & Vibrant Fiesta Chicken Salad: A Flavorful Family Favorite