Decadent Chocolate Gooey Butter Cake
Satisfy your sweet tooth with my rich chocolate gooey butter cake! Perfect for gatherings or a cozy night in—impress everyone with this delightful treat!

- The Chocolate Gooey Butter Cake That Stole My Heart
- Recipe Overview: A Modern Classic
- The Sweet Benefits of Chocolate Gooey Butter Cake
- Your Go-To Guide for Essential Ingredients
- Mastering the Professional Cooking Method
- Extra Yum: What You Need to Know About Chocolate Gooey Butter Cake
- Frequently Asked Questions
- Recipe Card
The Chocolate Gooey Butter Cake That Stole My Heart
Oh my gosh, let me tell you about the time i tried to impress my friends with this chocolate gooey butter cake for a potluck.
You know how it goes—everyone brings their a-game, and i had to do something special. standing in my kitchen, battling the urge to grab takeout instead, i thought of this rich, decadent delight.
And honestly, it turned out to be a game-changer! that first bite? pure magic!
This cake has its roots in st. louis, where they apparently know a thing or two about delicious desserts. it’s a modern twist on the classic gooey butter cake, giving it an ooey-gooey chocolate filling that melts in your mouth.
No wonder it’s one of those favorite bundt cake recipes ; it’s a crowd-pleaser for sure! with just one look at it, you can practically see everyone’s eyes light up in anticipation.
Recipe Overview: A Modern Classic
So, what’s the deal with this dessert? it’s not just a cake—it’s a whole experience. the beauty of the gooey butter pecan cake is in its simplicity.
It’s got a buttery base that’s dense enough to hold that rich filling of chocolate goodness. seriously, it’s like a warm hug in cake form.
And because it's super easy to whip up in about an hour, it’s perfect for those last-minute cravings.
When it comes to cost, this cake will run you about $10 for ingredients. not too shabby, right? plus, it yields 12 servings —so you can share (or keep it all for yourself; no judgment here!).
The Sweet Benefits of Chocolate Gooey Butter Cake
Let’s talk health benefits for a second. okay, sure, it’s a dessert, and we all know there’s sugar involved. but this cake includes rich ingredients like butter and eggs.
Those can give us some energy, right? eating chocolate can even boost your mood. who wouldn’t want that? so whether you're celebrating a birthday or just treating yourself on a tuesday, this cake fits the bill.
Now, if you’re looking for a dessert for special occasions, look no further. it’s perfect for birthdays, potlucks, or just a cozy night in with netflix.
Seriously, who wouldn’t want this dish as part of their award-winning chocolate desserts lineup?
What sets this cake apart from the rest of the best sweet treats out there is that gooey center. it's like a surprise at every slice.
And if you ever find yourself wondering why you should choose this over a boring chocolate cake, just think: gooey versus dry.
.. case closed!
Feel ready to dive into the deliciousness already? great! because next, we need to gather our ingredients. trust me, you won't want to miss out on crafting this amazing ooey gooey coconut cake that’s become a staple in my dessert arsenal.
Grab your measuring cups and let’s get started on this chocolatey adventure!
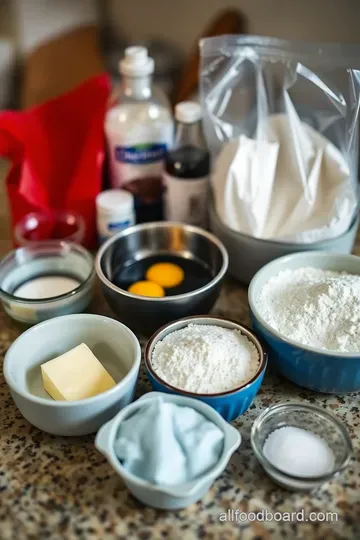
Your Go-To Guide for Essential Ingredients
Getting your kitchen stocked with the right ingredients makes all the difference when whipping up your favorite treats. whether you're eyeing that decadent chocolate gooey butter cake or a simple weekday dinner, knowing your ingredients elevates the experience.
So let’s break it down, shall we?
Premium Core Components
First off, we need premium core components for our baking adventures. When you head out to the store, keep these crucial tips in mind:
-
Measurements : for precision, stick to 1 cup (240 ml) for liquid ingredients and 1 teaspoon (5 ml) for smaller doses.
If you’re feeling adventurous and using the metric system, remember that 1 cup of flour weighs around 120 grams .
-
Quality Indicators : Freshness is key! Look for vibrant colors and unblemished options. For instance, your eggs should be firm and not floating (like a weirdo!).
-
Storage guidelines : most items like flour and sugar can hang out in a cool pantry. keep them sealed tight for up to a year! on the other hand, dairy ingredients should chill in the fridge and be used within a couple of weeks.
-
Freshness Tips : Always check expiration dates. Using fresh ingredients ensures that your baked goods taste their absolute best. A good practice? Sniff the open bag before buying—trust your nose!
Signature Seasoning Blend
Next on our ingredient tour is the signature seasoning blend . Spices can take a homely dish and make it feel like a five-star meal. Here’s how to spice things up:
-
Essential Spice Combinations : For your baking endeavors, think cinnamon and nutmeg for that warm, hearty flavor. It's like a hug in a bite!
-
Herb Selections : Dried herbs like thyme and rosemary can breathe life into savory dishes. While, for desserts, vanilla and almond extracts are my go-tos.
-
Flavor Enhancers : Don’t forget about salt! Just a pinch can amplify sweetness in desserts.
-
Regional Variations : Southerners love their Gooey Butter Cakes (which is probably why I'm always making them). Play around with the style! Try adding some coconut and macadamia for a Hawaiian twist.
Smart Substitutions
Ever find yourself in a pinch needing a sub for your muffin mix ? We've all been there. Here are some handy smart substitutions :
-
Common Alternatives : If you run out of brown sugar, a mix of white sugar and molasses does the trick.
-
Dietary Modifications : No gluten? No problem! There are tons of blends available—just look for that “gluten-free” crumbly goodness.
-
Emergency Replacements : No cocoa powder? Use carob powder; it won’t taste the same, but it’s a fun change!
-
Seasonal Options : Fresh fruits are a great addition in places where fresh flavors shine. Try some ripe strawberries for your cakes in summer!
Kitchen Equipment Essentials
Now, let’s chat about the kitchen equipment essentials you can’t live without. Trust me, these tools make cooking more fun—and less chaotic:
-
Must-have tools : a quality mixing bowl, a sturdy whisk, and an electric mixer (or just a lot of elbow grease).
Honestly, if i had to pick just one, it’d be my rubber spatula. it’s always there for me!
-
Alternative Equipment Options : No stand mixer? No worries! A hand mixer does just fine, and it gets you moving.
-
Preparation Tips : Always measure out your ingredients before you start—so much easier than scrambling around looking for a cup of flour!
-
Storage Solutions : Invest in some clear plastic bins for ingredients so you can see everything at a glance. Plus, they stack nicely!
So there you have it! knowing your core ingredients, spice blends, smart substitutions, and equipment essentials will set you up for baking bliss.
Get those ingredients ready because if you want to dive into making that chocolate gooey butter cake , you’re well on your way to dessert heaven!
Stay tuned for my next section, where I’ll lay out the step-by-step instructions to guide you through baking that luscious cake! Happy baking!
Mastering the Professional Cooking Method
It’s no secret that cooking professionally—or just like a pro at home—can be a total game changer in the kitchen.
Let’s dive into some essential preparation steps to help level up your kitchen skills and finally nail that chocolate gooey butter cake your friends have been raving about!
Essential Preparation Steps
First things first, let’s talk about mise en place . it’s a fancy french term for having everything in its place.
Set out all your ingredients before you start cooking. trust me, it saves so much time and keeps your space organized.
You ever start cooking and then realize you forgot an ingredient? it's a total buzzkill—the classic "oh snap!" moment.
Next, time management is key. got your prep? fantastic! now, let’s tackle a little timing. if you know your chocolate pecan butter cake will take about 40 minutes to bake, but you’re trying to whip up a frosting too? make your frosting first! you can chill it while the cake bakes.
Multi-tasking is your friend, just like aunt judy during thanksgiving dinners.
Speaking of being organized, keep your workspace neat. a clean kitchen is a happy kitchen (and it helps avoid accidents).
Don’t forget safety, either! always have a cutting board handy to avoid any slips and trips with your knife skills.
Safety first, folks!
Step-by-Step Process
Alright, here’s where the magic happens! Let’s break it down with some clear, numbered instructions.
-
Preheat your oven to 350° F ( 175° C) . Seriously, don't forget this step—it’s crucial for the baking to turn out right.
-
Prepare your base . Cream together the softened butter and sugar until it's light and fluffy (think clouds!). Then toss in that egg and some vanilla extract. Mix it all until smooth.
-
Make the filling . for the mind-blowing layer on top, grab cream cheese and butter, beat them together, and slowly mix in powdered sugar and cocoa powder.
You'll see it come together. oh, and don’t forget the eggs!
-
Layer it up! Spread that rich filling over the base. Try to keep it even—no one wants the cake to be lopsided like my first attempt at baking!
-
Bake in the oven for 35- 40 minutes , until the edges are set but the center is still a bit jiggly. This is a good thing!
-
Cool and serve . You want to let it chill for about 30 minutes before digging in. Trust me—it makes slicing so much easier.
Expert Techniques
Now onto some fun expert techniques—like little chef secrets! when baking, make sure you’re hitting those temperature control points . the last thing you want is a dry cake.
Just remember, the cake isn’t ready if it looks too set in the middle. aim for a gooey center like a perfect ooey gooey coconut cake .
Keep your eyes peeled for visual cues during baking. If the edges look golden and it’s slightly puffy, you’re on your way.
Success Strategies
So, you’re feeling confident, but let’s talk about some common mistakes. A classic is overbaking. Just don’t do it! That gooey texture is what’s gonna make your award-winning chocolate desserts so special.
When it comes to quality assurance, trust your instincts. If something seems off, maybe take a step back. Not every batch will be Instagram-worthy, and that’s okay!
If you really wanna impress, consider make-ahead options. Bake that gooey butter pecan cake the day before. It’ll only get better as the flavors meld.
Wrapping It Up
Cooking has its ups and downs, trust me! but with these techniques, you can create some of the best sweet treats that even your grandma would be proud of.
And if you ever want to venture into the realm of favorite bundt cake recipes , you’ll have all the skills you need.
So grab your apron, take a deep breath, and dive into that chocolate gooey butter cake. and when you pull it out of the oven, be ready for a love affair with chocolate like you’ve never experienced.
Stay tuned for some Additional Information and more tips on navigating your baking journey!
Extra Yum: What You Need to Know About Chocolate Gooey Butter Cake
Alright, listen up, friends! if you’re diving into the world of our chocolate gooey butter cake , you’re in for a real treat.
This cake is not just a buttery delight; it’s a gooey hug in dessert form! let’s chat about some pro tips, presentation tricks, and how to make things easier on yourself when baking this wonderful treat.
Pro Tips & Secrets
First off, oh my gosh, use room temperature ingredients! this is a game-changer. when you’re mixing that butter into the sugar, it’ll blend so much better.
You’ll achieve that light and airy texture without breaking a sweat.
Time-saving Tip : You can prep your filling while the base is baking. That way, by the time the oven timer goes off, you’re already halfway done. Boom!
For flavor enhancement, consider a little splash of espresso in the filling. It amps up the chocolate flavor like nobody's business! It’s like giving your taste buds a little surprise party.
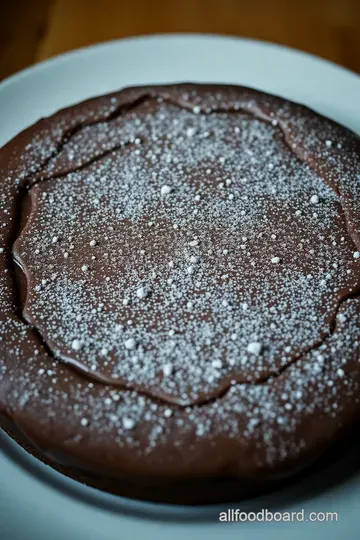
And presentation? don’t skip it! a light dusting of powdered sugar or cocoa on top makes it look fancy without needing a culinary degree.
Nobody needs to know how easy it was to whip this beauty up!
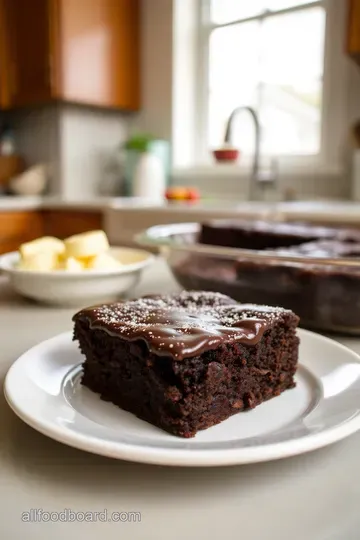
Perfect Presentation
Now, let’s chat plating ! when you’re serving this cake, think about elevating it. use a white plate to really let those deep chocolate tones pop, and why not add a sprinkle of nuts on the side? chopped pecans or walnuts give a crunchy contrast to that soft gooeyness.
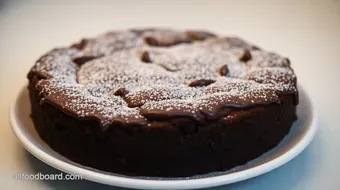
Garnish ideas : a few fresh berries or mint leaves on the side not only add color but a refreshing zing that perfectly balances the richness.
Symmetry is key, so to make it look super gourmet, slice those pieces clean and arrange them nicely. trust me, it’ll wow your guests!
Storage & Make-Ahead
Now, let’s keep it real—you might not finish the entire chocolate gooey butter cake in one sitting (though, i mean, we can all dream!).
For storage : keep it in an airtight container in the fridge for about 3-5 days . it’ll stay soft, if not a tad more gooey as the flavors meld together.
If you’re thinking about making it ahead of time, you can bake it a day prior! just let it cool completely before wrapping it tightly in cling wrap and popping it in the fridge.
The day you serve it, simply take it out and warm up slices in the microwave for about 10-15 seconds .
It’s like reuniting with an old friend!
Creative Variations
Let’s get adventurous! if you’re looking to mix things up, why not try a chocolate pecan butter cake ? just fold in some chopped pecans into the gooey filling.
Or go wild with flavor adaptations—how about some ooey gooey coconut sprinkled on top? it sounds crazy, but it could be your new favorite twist!
For those with dietary restrictions, there are swaps you can make. using a gluten-free flour blend works like a charm if you need it.
And if you want to play with the filling, using mascarpone cheese instead of cream cheese gives a richer, creamier experience while retaining that fabulous texture.
Complete Nutrition Guide
Now, i’m no nutritionist, but here’s the scoop: each slice carries about 350 calories . it’s one of those decadent treats, but hey, life’s short! this cake provides a fair amount of fat and carbs , so consider serving smaller portions, especially if you’re pairing it with ice cream or fruit (which, honestly, you should!).
Health Benefit : While you might think of this as just a dessert, chocolate does have some benefits, like antioxidants! So indulge a little guilt-free—just don’t tell your nutritionist!
Wrapping It Up
This chocolate gooey butter cake is more than just a recipe; it's an experience. whether you’re serving it at a family gathering or simply treating yourself after a long day, it’s bound to bring smiles and satisfaction.
Remember, cooking is about joy and flavor. so, throw on some tunes, grab those ingredients, and get baking! you’re gonna love the gooey, chocolatey goodness that comes from this cake.
Happy baking, friends!
Frequently Asked Questions
What makes a chocolate gooey butter cake different from regular chocolate cake?
The magic of chocolate gooey butter cake lies in its unique texture and flavor. Unlike standard chocolate cake, which is often fluffy, this dessert has a dense, buttery base topped with a rich, gooey filling that creates a delightful contrast. It's a bit like a brownie and a cake had a delicious baby!
How can I ensure my chocolate gooey butter cake doesn't turn out too dry?
To avoid a dry chocolate gooey butter cake, make sure not to overbake it. The edges should look set, but the center should still have a slight jiggle when you take it out of the oven. Think of it as the best kind of "underbaked"—just like a perfectly gooey brownie!
Can I make chocolate gooey butter cake ahead of time?
Absolutely! You can prepare this cake a day in advance. Just cover it tightly and store it in the fridge. The flavors will meld beautifully overnight, and when served chilled or at room temperature, it'll still be the decadent treat you love.
What are some tasty variations of the chocolate gooey butter cake?
There are plenty of ways to jazz up your chocolate gooey butter cake! Consider adding nuts like walnuts or pecans for a delightful crunch, or swap half the cocoa powder with espresso powder for a delicious coffee twist. The options are limitless—let your creativity run wild!
How do I store leftover chocolate gooey butter cake?
Store any leftovers in an airtight container in the fridge for up to 4 days. If you'd like to keep it longer, you can freeze slices wrapped tightly in plastic wrap for up to a month. Just defrost at room temperature before indulging in this chocolatey goodness again!
Is there a way to make the chocolate gooey butter cake gluten-free?
Yes! You can easily make this dessert gluten-free by substituting all-purpose flour with a 1:1 gluten-free flour blend. Just make sure to check the blend for any additional ingredients that might affect the taste. Enjoy your delicious gooey cake without any gluten worries!

Decadent Chocolate Gooey Butter Cake Card
⚖️ Ingredients:
- 1/2 cup unsalted butter, softened
- 1 cup granulated sugar
- 1 large egg
- 1 teaspoon vanilla extract
- 1 cup all-purpose flour
- 1 teaspoon baking powder
- 1/4 teaspoon salt
- 1 cup powdered sugar
- 1/2 cup unsalted butter, softened
- 2 large eggs
- 1 teaspoon vanilla extract
- 1/3 cup cocoa powder
- 8 oz cream cheese, softened
🥄 Instructions:
- Step 1: Preheat your oven to 350°F (175°C).
- Step 2: In a mixing bowl, cream together the softened butter and granulated sugar until light and fluffy.
- Step 3: Add the egg and vanilla extract; blend until combined.
- Step 4: In another bowl, whisk together the flour, baking powder, and salt. Gradually add to the wet mixture until just combined.
- Step 5: Spread the base mixture evenly into the prepared baking dish.
- Step 6: In a clean bowl, beat the softened cream cheese and butter until smooth.
- Step 7: Gradually mix in the powdered sugar, then add the eggs one at a time, followed by the vanilla and cocoa powder. Mix until well combined and smooth.
- Step 8: Pour the filling over the base layer in the baking dish, using a spatula to spread evenly.
- Step 9: Bake in the preheated oven for 35–40 minutes, or until the edges look set but the center appears slightly jiggly.
- Step 10: Allow to cool in the pan for at least 30 minutes before slicing into squares. Serve warm or at room temperature.
Previous Recipe: Sweet and Savory Soy Sauce and Brown Sugar Glazed Chicken Recipe
Next Recipe: Autumn Delight: Pumpkin Cake Mix Cookies You'll Adore