Perfectly Flaky Homemade Pie Crust
Discover the perfect pie crust recipe for both sweet and savory pies. Try my easy, flaky homemade version with tips for the best results!

- Let's Talk Pie Crust: Your New Favorite Recipe!
- Recipe Overview: A Slice of History
- Why You’ll Love This Pie Crust
- Ready to look into into the Pie Crust Ingredients?
- Your Essential Ingredients Guide for Perfect Pie Crust
- Mastering the Art of Professional Cooking: Pie Crust Recipe Edition
- Mastering the Art of Pie Crust: Additional Recipe Information
- Frequently Asked Questions
- Recipe Card
Let's Talk Pie Crust: Your New Favorite Recipe!
Picture this: it’s a crisp fall day. the leaves are falling, and your stomach is grumbling for a slice of that iconic apple pie.
But hold on a sec! what’s a great pie without a flaky pie crust ? honestly, if you’ve ever tried to whip up a pie crust before and were left with a hunk of sad, soggy dough, you’re gonna want to stick around.
I’ve been there, too. and let me tell you, mastering a homemade pie crust is like unlocking a secret door to the world of incredible pies and tarts.
So grab your baking gear, and let’s dive into this journey together!
Recipe Overview: A Slice of History
The classic pie crust recipe has deep roots in american kitchens. early settlers fashioned simple doughs, creating savory pie crusts filled with everything from meat to veggies.
Fast forward to today, and this simple dough is a staple for countless dessert creations, from that oh-so-sweet pecan pie to a buttery quiche.
It’s practically a rite of passage in many homes during holidays or family gatherings.
Now, don’t sweat it if baking is new to you. this recipe is pretty straightforward. you’ll need about 45 minutes , combining prep time and some chilling.
It’s not rocket science, but it does have a couple of steps that are crucial to lock in that buttery goodness.
And guess what? you won’t break the bank either. you can whip up this dough for just a few bucks, and it makes enough for two 9-inch pies.
Talk about a win-win!
Why You’ll Love This Pie Crust
Now, let’s chat about the goodies that come with mastering this pie crust recipe . first off, it’s healthier than store-bought options, mainly because you get to decide what goes in it! no weird additives here, just simple pie crust ingredients like flour, butter, and a dash of salt.
For those health-conscious folks, there’s always a way to sneak in whole wheat flour or go for a gluten-free pie crust option too.
Another thing? this crust is the chameleon of the pie world! it can transform from sweet to savory depending on what you’re baking.
Imagine serving a delicious quiche at brunch or a chocolate pie for dessert—this crust does it all. if you want to impress your friends at your next potluck, serving pies made with this easy pie crust recipe will definitely shine.
And let’s not forget special occasions. whether it’s thanksgiving, birthdays, or tuesday, making a pie can elevate any day to something special.
Plus, there’s something about the aroma of freshly baked pie wafting through the house that’s downright comforting.
Ready to look into into the Pie Crust Ingredients?
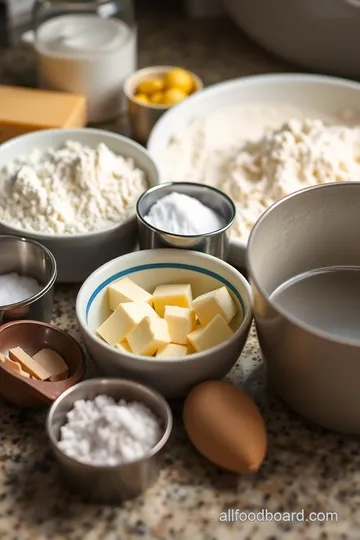
Now that i’ve shared a bit about why this recipe is a must-try, let’s talk ingredients! you’ll need just a handful: all-purpose flour, cold butter, salt, and maybe some sugar if you’re feeling sweet.
The coolest part? you can play around with flavors! ever tried an herb-infused pie crust ? seriously, sprinkle in some dried rosemary for a twist on your quiche base; it’s a game changer.
So, let's get ready to break out that rolling pin and make some magic happen! next up, i’ll go over the nitty-gritty steps so you’ll be well on your way to creating the most perfect pie crust you’ve ever made.
Grab your dish, and let's get cookin'!
Your Essential Ingredients Guide for Perfect Pie Crust
So, you’ve decided to bake a pie? that’s awesome! there's nothing quite like a warm slice of homemade pie straight from the oven, right? but before turning those ambitious dreams into gooey desserts, let’s dive into the essential ingredients you’ll need for that flaky pie crust everyone will love.
Premium Core Components
First things first, let’s talk about those basic pie crust ingredients . you’ll want a solid base, and that mostly starts with flour.
For a classic pie crust recipe, i recommend using 2 ½ cups of all-purpose flour (about 312.5 g). it’s the workhorse of most crusts!
Now, you can’t forget the butter. you’ll need 1 cup of unsalted butter, chilled and cubed (226 g). trust me, the cold factor is key here.
It helps create that perfect flaky texture.
Freshness and Quality Matters
When shopping for ingredients, you’ll want to look out for quality. Fresh butter should smell creamy and have a nice, rich color. And flour? Give it a sniff—no weird odors, please!
Storage matters too. Keep your flour in a cool, dry place. Butter? Fridge it up for up to a month. Just keep an eye on expiration dates.
Quick tip: If you’re unsure about your flour’s freshness, try a quick taste test. A pinch of it shouldn't taste stale or off!
Signature Seasoning Blend
Let’s spice things up! for that perfect buttery crust, just a pinch of 1 tsp salt (5 g) will do the trick.
And if you’re aiming for a little sweetness, add 1 tablespoon of granulated sugar (12.5 g). it’s totally optional, but trust me, a hint of sugar makes a world of difference in sweet pies!
If you want to play around, consider herb-infused pie crust . Think of mixing in dried oregano or thyme for savory pies like a quiche! Now we’re talking!
Smart Substitutions
Maybe you’re eating gluten-free or have a dairy sensitivity? No biggie! Use a gluten-free pie crust mix. Your crust will still taste bomb!
And if you’re short on butter, don’t sweat it! Substitute with coconut oil for a unique flavor twist. Just remember, keep that nice chill factor!
Also, you can use vegetable oil in a pinch, but I promise, nothing beats a butter pie crust !
Kitchen Equipment Essentials
Alright, let's get into the gear. you really don’t need much. grab a mixing bowl , a pastry cutter or fork , a rolling pin , and a 9-inch pie pan .
Super easy, right? if you’re feeling fancy, a pastry cutter is a real game-changer, giving you that crumbly goodness without breaking a sweat.
For storage, plastic wrap is a must for chilling your dough. Trust me on the chilling time—it’s crucial for flaky crust perfection!
Pro Tips for Perfect Pie Crust
Now, what’s my secret? chill your ingredients! keeping everything cold means you’ll get less gluten, which, my friends, means a more tender crust.
And don’t forget to let your dough chill for at least 30 minutes before rolling it out. this is non-negotiable!
Also, when you’re rolling out your dough, don’t stress about getting it perfect. dough rolling techniques come with practice. just make sure to turn it and dust with a bit of flour to avoid sticking.
Why It Matters
Mastering your homemade pie crust is like a rite of passage—your friends will look at you like a baking wizard! so say goodbye to store-bought stuff.
This is where you take control, create some seriously delicious food memories, and hey, impress your family.
In the next section, we will dive deep into your step-by-step instructions for that fabulous pie crust recipe . Get ready to roll up your sleeves; pies are about to happen!
So grab your ingredients and let’s turn that crust into something magical!
Mastering the Art of Professional Cooking: Pie Crust Recipe Edition
Alright, friends, gather 'round because today we're diving into something that’s as essential to baking as sugar is to cake — the pie crust recipe .
Making the perfect flaky pie crust may seem daunting, but stick with me! i’ve got the insider scoop, and i promise you’ll nail it.
Let’s get cooking!
Essential Preparation Steps
First things first, let’s talk about mise en place . this french term simply means “everything in its place.” chop your ingredients, measure out that all-purpose flour , and have your butter chilled and cubed.
This keeps your workspace clean and makes the process flow smoother, you know?
Time management is next on the list. make sure you're working in a well-timed manner. you don’t want to be frantically rolling out dough while the oven's already heated to 375° f ( 190° c) ! plan ahead.
Organization strategies are vital, too. have your kitchen tools at hand: mixing bowl, pastry cutter, and rolling pin. it saves you from running around like a headless chicken.
Trust me, i’ve been there!
Don’t forget about safety considerations . Keep your workspace tidy to prevent any accidents like slips or spills. And for the love of all things buttery, watch those sharp tools!
Step-by-Step Process
Now, let’s get into the nitty-gritty of how to make that dreamy crust:
- Combine Dry Ingredients: Start by whisking 2 ½ cups of all-purpose flour with 1 tsp of salt and 1 tbsp of sugar until it’s well blended.
- Cut in the Butter: Toss in 1 cup of chilled, cubed butter . Use a pastry cutter or even a fork. You’re looking for a coarse crumb texture that sticks together nicely when pinched, yet isn't too blended.
- Add Ice Water: Gradually mix in 6-8 tbsp of ice water , one tablespoon at a time. Give it just enough love until it forms a dough—not a muddy mess.
- Chill the Dough: Wrap it up and refrigerate for at least 30 minutes . This dough needs to relax!
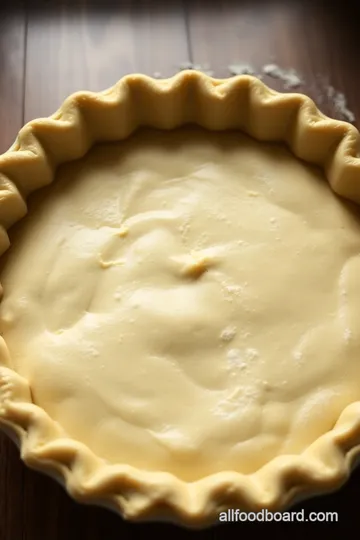
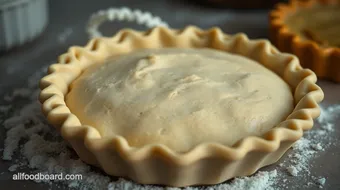
Roll it out to about ¼ inch thick on your floured surface. keep your rolling pin moving and avoid sticking! if this feels tricky, just take a deep breath; we’ve all been there.
-
Pre-bake (if needed): for a pre-baked crust, prick the bottom with a fork, cover it with parchment and fill with weights.
Bake for 15 minutes , remove the weights, and let it go for another 10- 15 minutes .
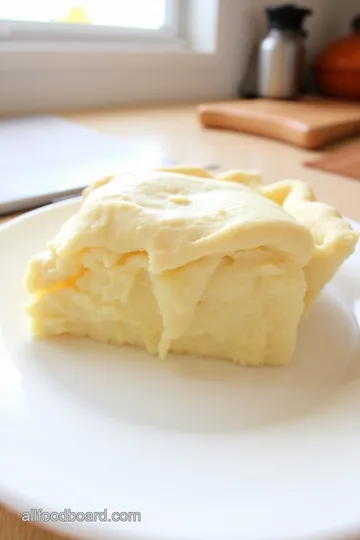
You want a golden delight, not a sad, soggy crust!
-
Fill and Bake Again: Now, fill it up with your desired filling and bake again according to your recipe. Voila!
Expert Techniques
Once you get the hang of the basic method, you’ll want to switch things up with some expert techniques . think about using a butter pie crust for a rich flavor or even trying out a savory pie crust with herbs mixed in.
Totally gourmet!
Keep an eye on those quality checkpoints : look for a beautiful golden finish and a crispy edge. if it feels a bit tough or too firm after baking, remember the key is to avoid overworking that dough! and if you find it won’t come together, a little bit of cold water can save the day.
Success Strategies
Here are some success strategies that keep my baking from turning into a total flop:
- Avoid common mistakes like using warm butter or forgetting to chill your dough! Seriously, let it chill to prevent that shrinkage.
- For quality assurance , keep it simple: Flaky layers and a buttery flavor are your best friends.
- Consider make-ahead options ! You can make the crust in advance and freeze it. Just thaw overnight, and you’re good to go!
In a nutshell, mastering a perfect pie crust is all about knowing your ingredients and the process. Plus, with some pie crust tips under your belt, you’ll impress your friends and family every time with your homemade pastries!
And now that we’ve covered the basics of crafting a fantastic pie crust, let’s talk about some extra goodies that can elevate your baking even further! Here's where the fun really begins with additional information…
Mastering the Art of Pie Crust: Additional Recipe Information
Making a pie crust recipe that’s buttery and flaky is like a rite of passage for any home cook. it's not just baking; it’s an experience.
Let's dive into some pro tips, presentation ideas, and more to ensure your pie cravings are always satisfied.
Pro Tips & Secrets
Chef's insights: here’s the deal, keeping your ingredients chilled is key. you know how they say “keep it cool”? well, it especially applies to your butter and water.
This is where that flaky magic happens! remember, the colder, the better.
Time-saving techniques: if you’re short on time (don’t we all have those days?), try making your homemade pie crust dough the night before.
Just store it in the fridge, and it won't lose any love overnight.
Flavor enhancement: want to step your pie game up a notch? a sprinkle of sugar for sweet pies or adding a pinch of salt to savory versions can elevate the flavors.
And oh, if you’re feeling fancy, try an herb-infused pie crust for savory fillings!
Presentation advice: first impressions matter. when you finally unveil your creation, be sure to cut it neatly. it’s all about those clean edges, my friend.
Dust the top with a little powdered sugar for sweet pies or a sprinkle of sea salt for a savory pie.
Perfect Presentation
Plating Techniques: A beautiful pie deserves a stunning display. Place it on a rustic wooden cutting board or a stylish cake stand. It immediately transforms it from just dessert to a centerpiece!
Garnish Ideas: A dollop of whipped cream, fresh berries, or a scoop of vanilla ice cream can take your dessert to the next level. These little additions create a picture-perfect slice.
Color Combinations: If you’re whipping up a fruit pie, think about the colors. A vibrant berry pie can shine against a white plate or a wooden board. It’s all about contrast!
Visual Appeal Tips: Don’t underestimate the power of a lattice top or a crimped edge. It adds that wow factor and shows off a little bit of your baking skills.
Storage & Make-Ahead
Storage guidelines: if you have leftover pie (which is a big if , let’s be real), wrap it in plastic wrap and store it in the fridge.
It’s usually good for about 3 days.
Preservation Methods: For longer storage, consider freezing your pie unbaked. Wrap it well in plastic wrap and foil. When you’re ready for it, pop it in the oven frozen—no thawing required!
Reheating Instructions: To reheat, just pop that baby back in the oven at 350° F for about 15- 20 minutes. You want it warmed through and crispy again, not soggy.
Freshness Duration: As a general rule, if it’s a cream pie, eat it within 2 days. For fruit and savory pies, you can stretch it to about 5 days refrigerated.
Creative Variations
Flavor adaptations: don’t be afraid to play around! swap out the all-purpose flour with whole wheat flour for a nuttier bite, or you could try a gluten-free pie crust blend for a lighter touch.
Dietary Modifications: Going dairy-free? Use coconut oil instead of butter for a pie crust that still shouts flavor. It’s easy to experiment with sweet and savory fillings, too.
Seasonal Twists: Think about the season! In fall, use pumpkin filling; in summer, fresh peaches. Change it up according to what’s fresh and in season.
Regional Variations: Every region has its own pie love. Whether it's a pumpkin pie in New England or a pecan pie in the South, adapt your crust to fit your flavor.
Complete Nutrition Guide
Detailed Breakdown: Honestly, this pie crust recipe leans more on the “treat” side of things, so moderation is key. For a classic slice, think about around 250 calories.
Health Benefits: A homemade crust lets you know exactly what’s in there. Plus, making it yourself means you can control the sugar and fats.
Dietary Considerations: If you’re keeping an eye on nutrition, you can reduce the sugar or use a healthier fat like avocado or a light oil when necessary.
Portion Guidance: If you’re sharing (or not), cut it into smaller slices. Everyone loves a pie but let’s be real— a small piece can satisfy that sweet tooth without overdoing it.
And, there you have it! armed with these tips, techniques, and variations, i can honestly say you're ready to rock that pie crust recipe .
Go ahead, get in that kitchen, and create something spectacular. at the end of the day, remember that perfection is not the goal; it’s the joy of making and sharing that pie that truly matters.
So grab your favorite filling, roll out that dough, and bake your heart out!
Frequently Asked Questions
What makes this pie crust recipe flaky?
The key to a flaky pie crust is using cold butter and minimal mixing. When you cut the butter into the flour, it creates small pockets of fat that expand during baking, resulting in a light and flaky texture. Make sure to handle the dough carefully to keep it tender.
Can I make this pie crust recipe in advance?
Yes, you can prepare the dough ahead of time! Wrap the individual discs of dough in plastic wrap and store them in the refrigerator for up to 3 days or freeze them for up to 3 months. Just remember to thaw the dough in the fridge overnight before rolling it out.
What are some variations I can use for this basic pie crust?
This pie crust recipe is versatile! You can substitute half of the all-purpose flour with whole wheat for a nuttier taste, or use gluten-free flour for a gluten-free option. Additionally, consider adding dried herbs like rosemary or thyme for savory pies, or sugar for sweeter versions.
How do I prevent my pie crust from shrinking during baking?
To prevent shrinking, make sure to chill the dough thoroughly before rolling it out and before baking. Also, when rolling out the dough, be careful not to overwork it. If you poke the bottom with a fork before adding weights for blind baking, it helps prevent bubbling and shrinkage.
How should I store leftover pie crust?
If you have leftover pie dough, simply wrap it tightly in plastic wrap and refrigerate it for up to three days. For longer storage, freeze it wrapped in plastic and placed in a freezer-safe bag for up to three months. When ready to use, thaw it in the fridge overnight before rolling it out.
Is there a healthier alternative to butter in this pie crust recipe?
Yes, you can substitute butter with coconut oil or vegan butter for a dairy-free option. Although the texture may differ slightly from traditional butter, you'll still achieve a deliciously flaky crust. Just ensure your substitute is cold, just like butter, for the best results!
Perfectly Flaky Homemade Pie Crust Card
⚖️ Ingredients:
- 2 ½ cups all-purpose flour (312.5 g)
- 1 cup unsalted butter, chilled and cubed (226 g)
- 1 tsp salt (5 g)
- 1 tbsp granulated sugar (12.5 g) - optional for sweet crust
- 6-8 tbsp ice water (90-120 ml)
🥄 Instructions:
- Step 1: In a large mixing bowl, whisk together flour, salt, and sugar until well mixed.
- Step 2: Add chilled, cubed butter to the flour mixture and cut it into the flour until it resembles coarse crumbs.
- Step 3: Gradually add ice water, one tablespoon at a time, and mix gently until the dough comes together.
- Step 4: Divide the dough in half, shape into discs, wrap in plastic wrap, and refrigerate for at least 30 minutes.
- Step 5: On a lightly floured surface, roll out each disc into a 12-inch round and transfer one round into the pie pan.
- Step 6: For a pre-baked crust, poke the bottom, cover with parchment paper, fill with weights, and bake at 375°F (190°C) for 15 minutes.
- Step 7: Add your desired filling and cover with the second rolled-out dough if making a double-crust pie; bake according to filling instructions.
Previous Recipe: Quick & Easy Salsa Recipe: My Zesty Fresh Salsa Classic
Next Recipe: Summer Breeze Iced Coffee Recipe: Refreshingly Easy for Hot Days