Perfectly Piped Royal Icing for Decorated Treats
Discover my easy royal icing recipe! Learn how to pipe like a pro, with tips for consistency and decorating cookies. Let's create sweet masterpieces together!

- Let’s Talk Royal Icing!
- The Scoop on Royal Icing
- Why You’ll Love Royal Icing
- The Perfect Transition to Ingredients
- Essential Ingredients Guide: The Building Blocks of Deliciousness
- The Art of Professional Cooking: Mastering Royal Icing
- Pro Tips & Secrets for the Ultimate Royal Icing Recipe
- Perfect Presentation: Make It Pop
- Storage & Make-Ahead: Keep It Fresh
- Creative Variations: Spice It Up!
- Complete Nutrition Guide: Know Your Treats
- Wrap-Up: Decorate Like a Pro!
- Frequently Asked Questions
- Recipe Card
Let’s Talk Royal Icing!
Oh my gosh, have you ever tried to make decorated cookies and just felt like you were in over your head? i remember the first time i attempted to use a royal icing recipe.
It was for my cousin's birthday party, and i wanted those cookies to look epic . i set up everything, excited and ready to impress.
Let's just say, it was a sweet disaster. i mean, i had blue smudges and messy swirls everywhere! but that flub taught me a lot about the magic of royal icing and gave me quite a few laughs along the way.
So, if you’re like me—a novice with a dash of ambition—you're in the right place. i’m pumped to share an easy royal icing recipe that can transform your cookies from ho-hum to wow ! trust me; it’s easier than you think, and i'll guide you through some royal icing techniques that make it all doable.
The Scoop on Royal Icing
Royal icing has quite the fancy background! historically, it was used by the aristocracy to decorate cakes and confections. today, it’s a hit for parties, holidays, and any festive occasion.
I mean, have you seen those instagram-ready cookies? so beautiful, right?
In terms of timing, this royal icing recipe takes about 15 minutes of active prep , but the drying time can vary depending on your humidity.
It’s a medium-level challenge, but with some practice and the right tips, even beginners can create cookie masterpieces. plus, it costs about $5 to whip up enough icing for around 24 cookies !
Why You’ll Love Royal Icing
What sets royal icing apart from other frostings? well, for one, it hardens beautifully, creating a smooth finish that’s perfect for decorating.
Royal icing for sugar cookies is like a match made in baking heaven! and let’s talk health—while it’s primarily sugar, you can control ingredients easily.
And how cool is that? you get to decide if you want to use egg whites or try out a royal icing recipe without egg whites !
Perfect for parties, holidays, or just making tuesday a bit more exciting, royal icing is versatile. you can use it for gingerbread houses , fancy cake decorations, and even fun treats like decorative cookies for halloween.
Need some royal icing storage tips ? just keep it covered when you’re not using it; it’ll dry out faster than your favorite sitcom can wrap up a season!
The Perfect Transition to Ingredients
Are you as excited as i am? let’s dive into the ingredients you’ll need to make this perfect royal icing for decorations .
You'll be piping and decorating like a pro in no time. here’s a sneak peek before we jump into the how-to!
Gather your tools, and let’s get icing!
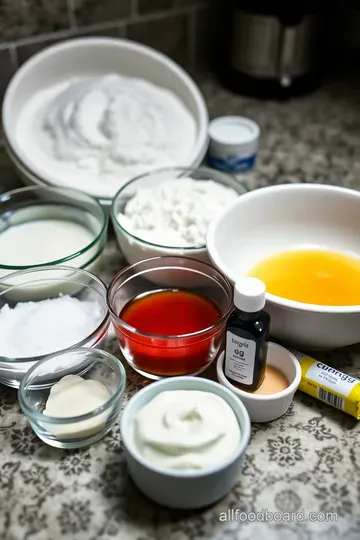
Essential Ingredients Guide: The Building Blocks of Deliciousness
Let’s dive into our essential ingredients guide ! whether you’re a novice baker or a seasoned pro, knowing your basics is key.
Think of it as the foundation for your future masterpieces, like cakes, cookies, and, oh yes, that royal icing recipe you’ve been dreaming about!
Premium Core Components: Know Your Stuff
Alright, let’s get real about premium core components . Every baker should have a handle on ingredient quality. Here’s the scoop:
-
Detailed Measurements : Always keep your measurements handy, both US and metric . Just 'cause you’re using a recipe from the other side of the pond doesn’t mean you can’t nail it!
-
Quality Indicators : Fresh is best! For example, your powdered sugar should be soft and clump-free. If it feels like a brick, toss it out!
-
Storage Guidelines : Did you know that most spices lose their punch after a year? Store them in a cool, dark place, and watch for expiration dates!
-
Freshness Tips : When buying produce, look for vibrant colors and a little give. Crummy-looking veggies? Leave 'em behind!
Spice Things Up: Signature Seasoning Blend
Next up, let’s chat about the magic of signature seasoning blends . You may think spices are just for flavor, but, oh honey, they elevate any dish!
-
Essential Spice Combinations : Think about garlic powder and onion powder – they’re like the dynamic duo in savory dishes.
-
Herb Selections : Fresh herbs can make or break a dish! Try pairing basil with tomatoes or cilantro with lime; it can take your royal icing techniques to a whole new level.
-
Flavor Enhancers : Always keep some lemon zest or grated cheese on hand. You’d be shocked at how much a hint of zest can wake up your flavors.
-
Regional Variations : Explore spices based on the region! Cumin in Mexican dishes vs. paprika in Hungarian cuisine? A whole new world of flavor!
Smart Substitutions: Bake with What You’ve Got
Let’s get real – sometimes you run out of ingredients, and that’s okay! Smart substitutions are your best friend:
-
Common Alternatives : No vanilla extract? Use almond extract! Trust me, it can be a game changer.
-
Dietary Modifications : Gluten-free? Swap out regular flour for almond or coconut flour. It’s that easy!
-
Emergency Replacements : Ran out of eggs? Try a mashed banana or applesauce in a pinch. Just don’t go doing that with your royal icing for sugar cookies unless you wanna try something wild!
-
Seasonal Options : Using what’s in season not only saves money but enhances flavor too. Think pumpkins in autumn or fresh berries in summer.
Kitchen Equipment Essentials: Tools to Triumph
Now, let’s set up your kitchen like a pro. Here are some must-have tools for baking success:
-
Mixing Bowls : You can never have too many. I mean, who wants to wash dishes constantly?
-
Electric Mixer : A must! Unless you want a workout mixing those cookie ingredients by hand...
-
Storage Solutions : Airtight containers for dry goods are your besties. They keep everything fresh, especially when you're stacking those cookie jars!
So, are you ready to level up your baking game? Who knows, you might be the next cookie decorator champion with the right tools and ingredients in your arsenal!
Conclusion: Let’s Get Baking
Alrighty then, it’s time to bring it home. with your essential ingredients grounded and your kitchen equipped, you’re all set for your baking adventures.
Next up? we’re diving into the fun stuff with some royal icing magic! grab your piping bags, and let’s turn those cookies into masterpieces with our royal icing recipe .
Happy baking, folks!

The Art of Professional Cooking: Mastering Royal Icing
So, you want to dive into the world of professional cooking ? one word: royal icing ! this magical icing can turn any treat into a masterpiece—be it for your aunt's cookie swap or that holiday gingerbread house competition.
But hey, before you grab those piping bags, let’s get our ducks in a row, shall we?
Essential Preparation Steps
First things first! we gotta talk about mise en place . this french phrase just means “everything in its place.” gather your 4 cups of powdered sugar , 3 egg whites , and 1 teaspoon of vanilla extract before you start.
Trust me; it makes the process so much smoother!
Time management is key. set aside a good 15 minutes for prep. you may think that’s a breeze, but if you’re like me, distractions (hello, netflix) can sneak up on you! keep it organized to avoid any “wait, where’s my powdered sugar?” panic.
Safety first—especially with that egg white business! if you’re worried about raw eggs, consider the egg white powder alternative. it adds a nice layer of comfort if you’re sharing your treats with kids or food-safety aficionados.
Step-by-Step Process
Alright, let’s get into the nitty-gritty of how to make this royal icing shine. Here’s your handy-dandy step-by-step guide:
- Prep Your Ingredients : Measure everything out—no one likes to fumble while holding a whisk.
- Sift the Sugar : To avoid lumps, sift that powdered sugar into a large bowl. You’ll thank yourself later.
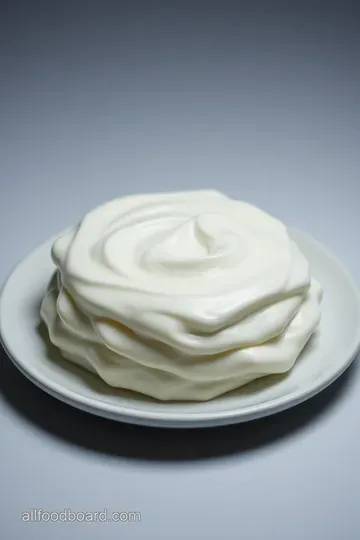
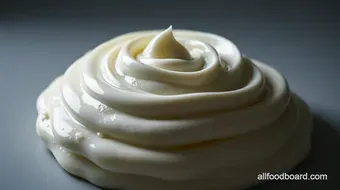
- Mix It Up : In a separate bowl, whip those egg whites with cream of tartar and vanilla until it looks super glossy and forms stiff peaks—about 5- 7 minutes .
- Combine : Gradually add the egg mixture to the sugar. Beat until fully blended.
- Check Consistency : Too thick? Add a few drops of water. Too thin? More sugar!
- Color It Up : Wanna get artsy? Split the icing for various colors using edible food coloring .
- Decorate : Fill those piping bags and let your creative juices flow! Remember, allow the icing to dry before stacking your cookies—no one wants a sticky mess.
Expert Techniques
Now that you’ve whipped up your royal icing, let’s get a little fancy!
It’s all about consistency . perfect royal icing should smoothly drizzle and disappear in about 10 seconds . that’s called the “10-second rule” for a reason! practice on parchment paper if you need to.
You’ll want to avoid that dreaded “oops” moment when your icing doesn’t hold its shape.
Keep quality in check by running a visual inspection; ensure there are no air bubbles or lumps. and if something goes sideways, like the icing doesn’t dry, it might be due to humidity.
Tweak your sugar-to-water ratio for the perfect batch next time.
Success Strategies
Listen, we’ve all made mistakes in the kitchen (yep, I’ve burned cookies more times than I can count). Here are some commonsense strategies to avoid those pitfalls:
- Don’t rush your royal icing drying time —let it dry completely before you move on. This could take anywhere from 1- 8 hours , depending on the humidity.
- Use an airtight container for any leftover icing. Trust me, you’ll want to use it later for quick sugar cookie decorations.
- Got a gluten-free crowd? No worries! Swap in gluten-free powdered sugar, and you’re golden.
Remember, experience makes perfect. Practice your royal icing piping techniques until you feel like a pro!
As you navigate the delightful realm of royal icing, you’ll find it becomes second nature. there's something truly rewarding about baking cookies with royal icing that not only taste delicious but look as good as they taste.
Ready to spread your wings and dive deeper?
Additional Information
Stay tuned, because next up, we're diving into even more tips and ideas for elevating your baking game. It’s time to turn those cookie dreams into sweet realities. Happy decorating, friends! 🍪
Pro Tips & Secrets for the Ultimate Royal Icing Recipe
Hey there, baking buddy! if you’re diving into the world of cookie decorating, you’ve probably heard a thing or two about royal icing .
Let me tell ya, it’s like magic for your sugar cookies and gingerbread houses! here are some pro tips and secrets i’ve picked up over the years to help you nail that easy royal icing recipe .
Beat the Clock: Time-Saving Techniques
You don’t want to spend your life in the kitchen, so let’s speed things up! first up, do yourself a favor and prep your piping bags ahead of time.
You can fill them with icing, tie them off, and store them in the fridge for when you need to unleash your creativity.
This way, you can jump right into decorating cookies with royal icing without having to fuss.
Flavor Enhancement Tips
Okay, let’s talk taste. did you know a little vanilla extract makes a huge difference? just a teaspoon can elevate your icing from boring to oh-my-gosh-delicious! you can also experiment with edible food coloring to create fun hues for festive occasions.
Think pastel pink for easter or vibrant red for christmas. the world's your oyster!
Perfect Presentation: Make It Pop
Ever wondered how professional bakers make their royal icing shine? here’s the scoop—you want to focus on plating techniques and presentation.
A simple, clean look goes a long way. lay out your cookies on a colorful plate or cake stand, and if you’re feeling fancy, try a little sprinkle action.
Garnish Ideas That Wow
Remember, you eat with your eyes first! use color combinations that contrast with your icing—the brighter the better. combine pink icing with green flavors or a pure white icing with dark chocolate cookies.
Visual appeal isn’t just for instagram; it makes the whole experience more enjoyable.
Storage & Make-Ahead: Keep It Fresh
Let’s be real. Sometimes we butter-finger our baking and end up with leftover icing. Don’t throw it out! Here are some royal icing storage tips :
- Store any leftover icing in an airtight container to seal in freshness. Just be wary, royal icing can dry out quickly!
- The icing can last about 2 weeks in the fridge, so you have some wiggle room for last-minute decorating sessions.
Reheating Instructions
If your icing has thickened up in the fridge, just whip it a little bit on medium speed or add a few drops of water. Easy-peasy!
Creative Variations: Spice It Up!
So, you want to shake things up? Here are some cool royal icing variations to try out:
- Gluten-Free Royal Icing : Absolutely doable! Since royal icing is mostly sugar, just make sure your powdered sugar is gluten-free. Read those labels, folks!
- Lemon or Chocolate Royal Icing : Swap out vanilla extract for lemon juice or add cocoa powder for a rich chocolate flavor. Your cookies will thank you.
Complete Nutrition Guide: Know Your Treats
Now, while these cookies are great, knowing your nutrition is key for enjoying them guilt-free! each serving of royal icing (about a tablespoon) packs in around 60 calories , but it’s sugar, baby! good to know if you’re counting those calories.
Dietary Considerations
If you need a royal icing recipe without egg whites , you can use reconstituted egg white powder instead! It’s a game-changer for those wary of raw eggs.
Wrap-Up: Decorate Like a Pro!
And there you have it, my friend! whether you’re after a beautiful sugar cookie royal icing design or tackling the tower of festive cookies, remember to have fun with it.
Find your groove as you learn the royal icing techniques and share your edible art with loved ones! don’t shy away from experimenting; after all, baking is about joy.
So, get those piping bags ready! 🎉 happy baking!
Frequently Asked Questions
What is the best royal icing recipe for beginners?
The "Perfectly Piped Royal Icing for Decorated Treats" recipe is perfect for beginners! It uses simple ingredients like powdered sugar and egg whites, making it straightforward to mix. Just remember, achieving the right consistency is key, so don’t hesitate to practice!
How can I adjust the consistency of my royal icing?
If your royal icing is too thick, slowly add a few drops of water and mix until you achieve the desired consistency. Conversely, if it’s too thin, simply add more powdered sugar until it thickens. The "10-second rule" is a great guideline; it should take about 10 seconds for the icing to cover any drizzle you make.
Can I make royal icing in advance and how should I store it?
Absolutely! You can make royal icing up to a week in advance as long as you store it properly. Keep it in an airtight container covered with a damp cloth to prevent it from drying out. Just rewhip it before use if it thickens too much over time.
What are some variations to try with a royal icing recipe?
You can get creative with flavours! For a zesty twist, swap the vanilla extract with lemon juice for Lemon Royal Icing, or stir in cocoa powder for a chocolate version. These variations will add a lovely punch to your decorated treats!
Why did my royal icing not dry properly?
If your royal icing doesn't dry, it could be too humid in your kitchen or the icing may have been too thin. Make sure to let your treats dry in a cool, dry area, and don’t forget to check the consistency when piping. Having those stiff peaks is crucial for proper drying!
Can I use egg white powder instead of fresh eggs in royal icing?
Yes, you can! Reconstituted egg white powder is a great substitution and works well in royal icing recipes. Just mix it with the right amount of water following the package instructions before adding it to your icing mixture.
Perfectly Piped Royal Icing for Decorated Treats Card
⚖️ Ingredients:
- 4 cups powdered sugar
- 3 large egg whites
- 1/2 teaspoon cream of tartar
- 1 teaspoon vanilla extract
- Food coloring (optional)
🥄 Instructions:
- Step 1: Measure all ingredients carefully, including powdered sugar, egg whites, cream of tartar, and vanilla extract.
- Step 2: Sift the powdered sugar into a large mixing bowl to eliminate lumps.
- Step 3: In a separate bowl, combine egg whites, cream of tartar, and vanilla extract.
- Step 4: Gradually add the egg white mixture to the sifted sugar and beat on medium speed until the mixture is glossy and forms stiff peaks, about 5-7 minutes.
- Step 5: Adjust the consistency by adding a few drops of water if too thick, or adding more powdered sugar if too thin.
- Step 6: Divide the icing into smaller bowls for multiple colors, and add food coloring as desired.
- Step 7: Cover the icing with a damp cloth or transfer to an airtight container to prevent drying out.
- Step 8: Fill piping bags and pip on cooled treats. Allow the icing to dry completely before stacking or serving.
Previous Recipe: Classic Louisiana Red Beans and Rice Recipe: Comfort in a Bowl
Next Recipe: Easy & Creamy Chicken Spaghetti Recipe: A Family Favourite Bake